DIY Valentine’s Rag Wreath
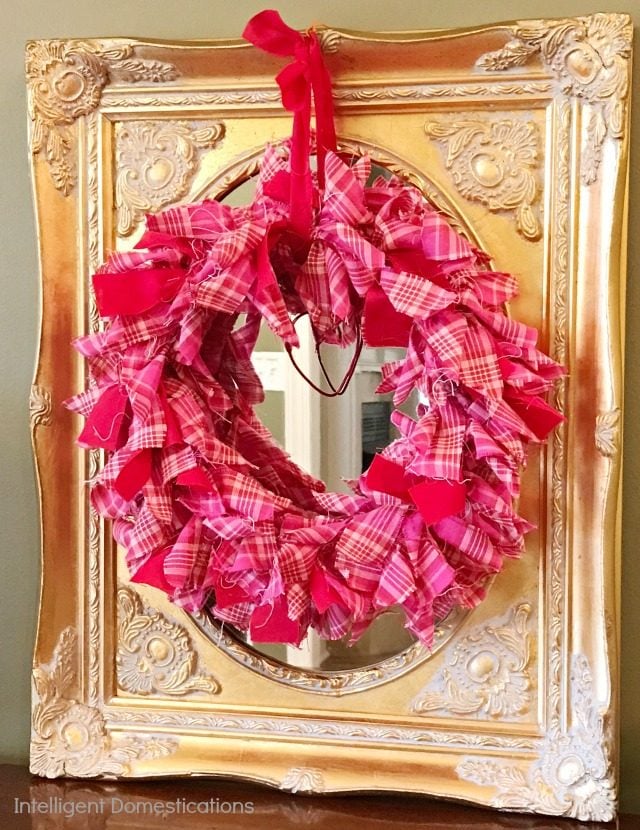
A DIY Rag Wreath is one of the most simple and easy wreaths you can ever make. This one is for Valentine’s decor.

Make A DIY Rag Wreath for any season. This pretty shabby chic Rag Wreath for Valentine’s was a quick addition to our home decor.
Fabric rag wreaths are super easy to make because you simply tie pieces of fabric onto a wreath form. You can use a wire wreath form with inner and outer rings or a styrofoam form as I do here.
This article contains affiliate links. Please see our disclosure policy.
Let’s get started. It’s so exciting to make your own home decor and save the budget in the process!
Supplies and Tools used for making this DIY Valentine’s Rag Wreath
Supplies
- One 10″-12″ Styrofoam wreath (Dollar Tree)
- 3/4 yard patterned fabric (I prefer cotton fabric)
- 1/2 yard contrasting fabric
- One piece of red floral wire (Dollar Tree)
Tools
- Rotary cutter
- Ruler
- Pencil
- Wire Cutters
- Glue Gun
- Hot Glue
I purchased my fabric from the bolt but you could also use fat quarters. There are so many to choose from in lots of really pretty patterns with matching contrasting patterns available as well.
I fell in love with this pretty red and pink plaid cotton fabric when I first laid eyes on it! What a perfectly affordable way to make an addition to our Valentine’s home decor! No sewing involved!

Fabric Rag Wreath Tutorial
Step 1
Begin by cutting your fabric strips. If you have a cutting mat and rotary cutter, it makes the process go quicker.
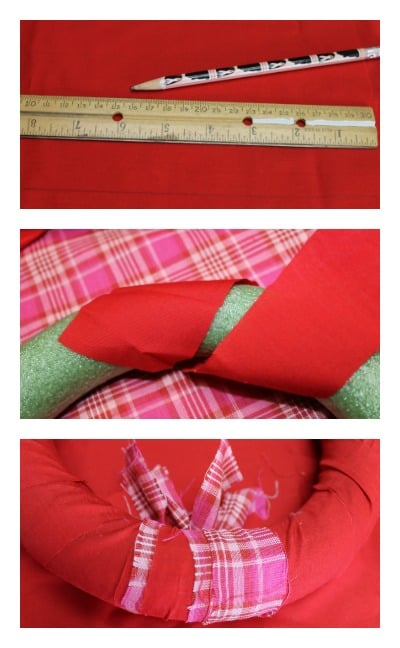
I used a ruler to create the template for my rag pieces. The strips of cloth are 12″ long and the width of the ruler. Mark them off using the pencil and ruler as shown and cut.
If you want a shabby chic look, leave the loose threads hanging. If you want a neater look, I suggest cutting your fabric with pinking shears.
Step 2
Next, I cut one long wide strip of the red fabric to wrap the styrofoam wreath form. If you plan to hang your wreath on a mirror, you will want the backside to be pretty too so don’t skip this step.
Step 3
Now it is time to begin tying on the strips of fabric you cut out. Tie each strip around the wreath using a double knot. I wanted my Rag Wreath to look really full so I used a lot of strips and tied them close even overlapping them.
My contrasting solid red fabric is placed in every 8th spot. I fell in love with that pretty pink and red plaid!
Step 4
Make the Hanger
Cut one long piece of fabric for the hanger. Lay this aside until you have made the wire heart that will hang from it.
Now your DIY Valentine’s Rag Wreath is complete but I decided to add a little wire heart to hang in the center so scroll down for how that is made.

Make the Hanging Heart
Step 1
Using wire cutters, cut a piece of the red floral wire which is available at the Dollar Tree.
Shape the wire into a heart and set it aside. This wire is very pliable so this step is really easy.
Step 2
Cut another long piece of the floral wire to become the hanger for the heart. The length depends on how low you want your heart to hang and what type of wreath form you used.
Now shape this piece of floral wire into a loop. Slide the heart into the loop and pinch the loop closed.
Step 3
Hang the heart on the cloth strip hanger and tie the end of the hanger strip into a good double knot.
Your new DIY Valentine’s Rag Wreath is ready to hang.
What kind of fabric to use for a Rag Wreath
Cotton fabrics are the best and they offer a wide selection at the fabric store in solid colors and prints. Cheap fabrics are perfect for making rag wreaths.
Rag wreaths are a great way to use up scrap fabric and make affordable seasonal decor for your home.
You can even use old cotton sheets or tablecloths for these. Do you have some flannel shirts to get rid of? Use those.
Go through your fabric stash and mix and match the colors and patterns to make your own rag wreath.

This is the perfect project to finish while watching TV one evening. Once you begin to tie on the fabric strips, it goes pretty quick.

More Ways to Celebrate Valentine’s Day
Make A Valentine’s Cone Tree using pretty tissue paper for a centerpiece
Cute Valentine’s BINGO Game Free Printable
7 Valentine’s Coloring Pages Free Printable
Chocolate Covered Strawberries Easy Recipe
How To Set Up A Valentines Hot Cocoa Bar


More DIY Wreath Tutorials
- DIY Mini Christmas Wreath for Kitchen Cabinets
- How To DIY A Witches Hat Wreath for Halloween
- Scarecrow Fall Wreath Tutorial
- Santa Snowman Wreath


This is awesome!! I will be doing this tomorrow!
I’m so glad you like it. Be sure to stop by my FB wall and share a photo. I’d love to see yours.
What a wonderful wreath, I like simple crafts and I love this.
Thanks for sharing it with Turn It Up Tuesday, voted as my favorite.Check here:http://www.thehappycreations.co.uk/turn-it-up-tuesday-09-02-16.php
Congratulations:)
Shirley, I just love this wreath! Look for your feature today at our link party!
Thank you Roxanne. I’m honored to be Featured among so many talented bloggers. I’ve shared your party on Pinterest. Thank you so much!
SO cute! I love this!
Thanks for joining Cooking and Crafting with J & J!
I’m not the craftiest of people, but even I can do this and I’m going to look into it. It’s great because it can be adapted to whatever holiday you need or want a wreath for. Thanks for sharing your post at the Over the Moon Link Party.
This wreath you made is so nice Shirley! You did a great job with the tutorial too.
Thanks for sharing this at Cooking & Crafting with J & J.
Enjoy the weekend and we hope to see you next week.
Julie xo
Cute Valentines project Shirley! Love how simple it is to make- something I can even tackle. 🙂
Cheers,
AJ
Shirley, Your wreath is adorable! Pinned and tweeted to share. Thanks for linking up with us at SnickerdoodleSunday!
We’re so excited to be featuring your post at this week’s Motivation Monday party!
I’m pretty excited for it to be featured at Motivation Monday. Much thanks!
Your wreath turned out good! Thanks for sharing on our link up party. I hope that you stop by again in the future!
Beautiful and frugal. I made on similar last year with scraps of fabrics, and it was sold at a church bazzar. Im planning to do another one this year. Visiting from My Paper Craze!!
Shirley, I love the wreath! Thanks for sharing it with us at the #HomeMattersParty this week. We hope you will link up again next Friday.
~Bonnie
Very cute wreath! I love the material you used! I have been wanting to make a rag wreath for a while now. I may just try it. Thanks for the great directions! I’m pinning it to my Wreath Pinterest board.
You always bring the cutest things to our party! Thank you. Pinned and tweeted. We feel honored that you take the time to stop by our party. I hope to see you on Monday at 7 pm. We love to party with you! Happy Saturday! Lou Lou Girls
This is simply adorable! I love the look of torn fabric/rag fabric. Thanks for sharing. Visiting from the Momma Told Me Blog Hop. 🙂
Lory
totally cute! love the shabby rag wreath! So easy to do in other colors too for any holiday or to match your decor!
I love this, a craft I might actually be able to do! Found you through the Evolution of Mom link party!
Pretty!
How adorable! I think I will make one with polka dots!
This turned out so cute! I am loving that pink plaid fabric. It especially pops next to the red.
Wow ! I love the rag wreath !Pinning ! I hope one day I will make wreaths like you ! I have never tried one but I have created a board and started pinning wreaths to get some idea and create one 🙂
This is so cute, I like the fabric you used. And you cannot beat that price for a craft, that is a win!
Shirley this is adorable! I love how simple and straightforward making it is! I just pinned and I need to make this for my door!
Thank you Jen for those kind words. Thanks for the Pin too 🙂 I’d like to see yours when you make it!
I love this look– super cute! Thanks for the simple directions– I think even I can do this one, too 🙂
Mitzi, if I can do it, anyone can because I am not a crafty person. My purpose for participating in the Spring Craft Blog Hop is to get in touch with my crafty side 🙂 I am stepping outside of my comfort zone.
Your wreath turned out great! How big is it?
Nevermind. I see it says 10-12 inches.
Thanks Erlene. I see you found the size in post. Looking forward to all the fun craft ideas we will see at the Spring Craft Blog Hop!