Mini Easter Egg Topiary Dollar Store Craft
Make this simple and easy Easter Egg Topiary tree using Dollar store supplies and glue in minutes.

Tackling a topiary project has been on my wish list for quite some time. A trip through the Easter decor at the Dollar Store inspired an idea to make an adorable little Mini Easter Egg Topiary! The process is so simple anyone can do it!
Easter crafts are always a fun way to celebrate spring. You can get older kids involved with this one. I love how these Easter trees turned out. They make bright and cheery Spring and Easter tabletop decor.
This article contains affiliate links. Please see our disclosure policy.

Supplies from Dollar Tree
I chose to use the foam easter eggs with sparkle colors, not plastic Easter eggs.
- Mini clay flower pot
- 3 Foam Decorated Easter Eggs in graduated sizes
- Silk flowers of your choice. I used Buttercups
- Green Foam Floral block
- Floral Moss
Other Not from Dollar Tree
- DecoArt White Acrylic paint (optional)
- E6000 glue
- Hot Glue gun and glue
How To Make Mini Easter Egg Topiary Tree
There are lots of Easter Eggs to choose from at Dollar Tree. I selected the ones attached to skewer sticks for two reasons. The sticks are going to be used and these eggs are foam which is perfect for this craft.
Look for the mini clay flower pots. They come three to a package so score three for one dollar!

Step 1 Paint the flower pot
Paint each terra cotta pot in any color of your choice. I wanted mine to be white. You can also use white chalk paint if you like that look. I prefer the shiny look.
I painted my pots two coats each of DecoArt White acrylic paint. Then I used one coat of Mod Podge to seal the paint.
Step 2 Add the floral foam
You need a small piece of floral foam inside the pot to insert the skewer stick that will hold the eggs.
Turn the pot upside down onto the floral foam to measure the cut. Just press down to create the mark as shown in the photo above.
I like to use a plastic craft knife because it seems to make less mess.
A box lid works great to containerize the process. You will have to trim the sides of the foam until it is a good snug fit for the pot. I did not glue the foam into the pot because it fits snugly.
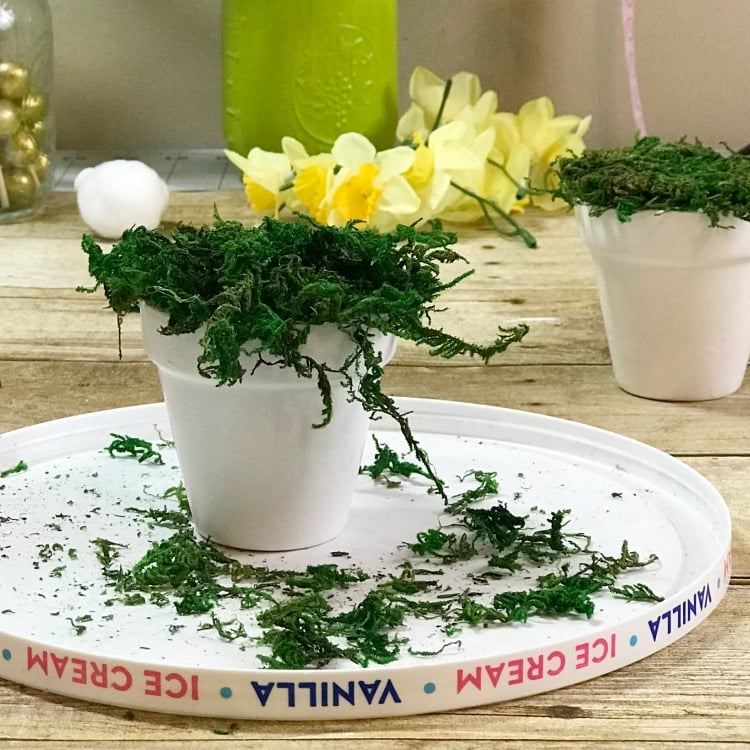
Step 3 Adding the grass
Adding the grass to the top of the floral foam is a process that only takes a minute but it can be messy. I use a large plastic container lid to catch the mess for easier clean-up.
Apply a dab of hot glue and carefully sprinkle the grass onto it. Tap it down gently so you don’t burn your fingers on the hot glue. That hurts.
Add the amount of grass that gives you the look you want. After your grass has been added, use a pair of craft scissors to trim the edges for a nice clean look.

Step 4 Designing your Easter topiary layout
This part is very important!! The eggs should be placed with the smallest on top and the larger egg on the bottom!
Photo A above shows how to use the skewer sticks you removed from the eggs to create a wall that will hold the eggs still while you determine the angles you want your topiary to be. Otherwise, the Easter eggs will roll all over your work surface.
Play with your design to choose what you like best before you begin to skewer the eggs. You get to be a bit of an architect in this step.
Photo B shows the angle at which to skewer the egg. This is important for the whimsical look of these Easter Egg Topiary trees.
I used three eggs per tree with the largest on the bottom and the smallest on top.
Step 5 Stacking the Easter Eggs
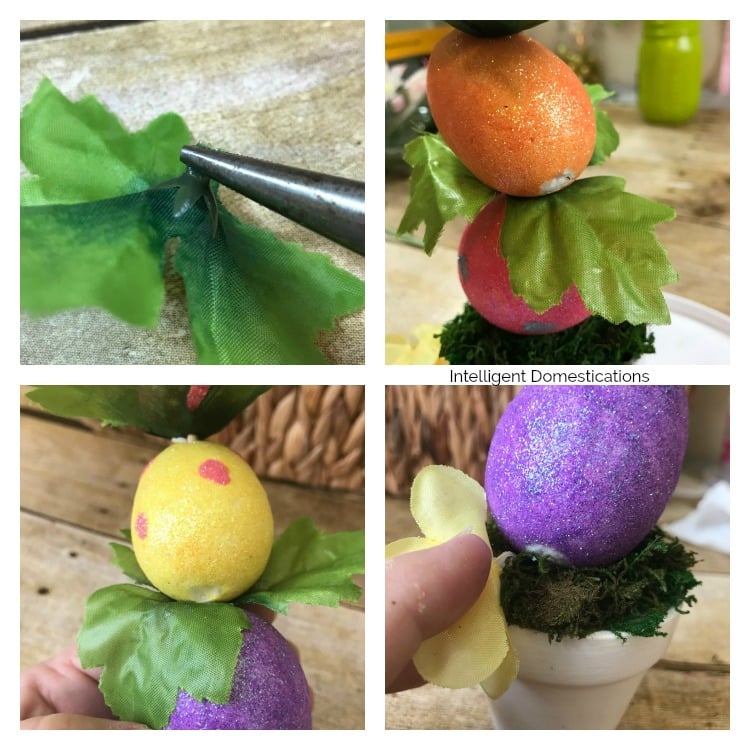
Recall that each of our foam eggs had a skewer stuck into the bottom of it. Removing the skewer stick from the foam egg left a big ugly hole so now we are going to fix that problem and create the look of eggs among the leaves. Use silk floral leaves for this. You can use the leaves on the little buttercup flowers from Dollar Tree.
Insert the skewer into the floral foam in your flower pot. Add the largest easter egg first pushing it down onto the grass on the flower pot.
Now add a leaf on top of the egg before adding the next egg.
Remove that little plastic piece first on the bottom of the leaf. Then insert one leaf between the egg, as shown. Dab a little E6000 or Elmer’s glue on the egg so the leaf will stay in place and keep the hole covered.
Step 6 Finishing the base of the topiary
Hot glue a flower or two at the base of your new Easter Egg Topiary.
I glued a silk Buttercup to hide the hole on the bottom egg as shown in the bottom right photo above. Because of the angle of the egg, the hole was showing. It was nothing a buttercup would fix.

And that is all there is to it. You can make a Mini Easter Egg Topiary for less than $5 using Dollar Tree supplies!
The design of these easter egg topiaries means the back of the eggs looks just as pretty as the front. Use your new Easter Topiary for an Easter vignette, tabletop decor, or mantel display.
More DIY Topiary Trees and Cone Trees
DIY Blue and White Moss Ball Topiary
How To Make A Easter Egg Cone Tree
How To Make A Valentine’s Cone Tree
Make This Festive Glittery Pom Pom Cone Christmas Tree

More Easter Ideas
15 Family Easter Traditions To Start This Year
21 Unique Ways To Decorate Easter Eggs
Ultimate Easter Magic Cookie Bars Recipe
Easter Bunny Giving Out Eggs Tablescape
Plastic Spoon Chicks Easter Table Decor
The Easter Bunny Cake Tradition


Updated February 17, 2022


I love decorations that are easy to make! Can’t wait to see what you link up on Merry Monday next week!
I really love these topiaries, Shirley! I was so surprised when I saw you used the foam eggs and not the plastic ones. It makes complete sense of course, no drilling required, lol. Fun, fun idea!
I love, love this topiary! Very creative & fun!
Very cute idea! So clever and I love the colors!
Super cute idea! #funtasticFriday
What a cute idea! I love how they turned out.
Adorable Easter egg topiary and fantastic tutorial. Pinning
I love how you stacked the eggs at different angles above the terracotta pots! ‘Seriously cute arrangement! -Marci @ Stone Cottage Adventures
These would make perfect centerpieces for smaller tables! The colors are so colorful and cheery!
I love how you angled the eggs to make it whimsical and the tip for trapping the moss is awesome!
I always forget to check our dollar stores for seasonal decorations. I need to remind myself so I can make cool stuff like this!
What a fun and frugal way to make a pretty Easter topiary, Shirley. The pops of color are perfect. The tutorial is great, too. Pinning to my Easter Board.
I love this idea. This is such a wonderful table decoration!
What a lovely cute idea to use for decor and centerpiece on Easter. Glad all the materials I can find at the dollar store that makes it so accesible.
I could see these all over the house , bathroom, kitchen, even at the office. Excellent idea. Very creative.
Shirley, This is such a fun idea and how cute would these look on the Easter table? Gotta love Dollar Store crafts! Pinning to share.
This is such a fun Easter craft! I love an egg topiary!
This such a cute Easter topiary! I actually always to try and make a topiary and this DIY looks easy to make!
These are really cute and they look so easy! Plus I thought you bought them somewhere, so you are an excellent crafter. 🙂
These are so cute! I love this idea and they seem really simple to make. I have also found some great things from a dollar store to turn into fun craft or low cost decor items.
This. Is. Awesome. I love your cute Easter Egg topiary! I bought those same Easter eggs and haven’t used them yet….maybe Ali and I will make you topiary!
Those are so cute!
The different angles of the eggs make them so whimsical!
That is amazing. I never knew you could create a beautiful item like this from the Dollar Store. Totally grabbing a hot glue gun and trying this.
I love all kinds of topiaries and your Easter egg topiary is adorable, Shirley! What a terrific ideas to use the colorful egg picks to make yours! They really turned out pretty and perfect for Easter!