Make A Sewing Storage Box From A Jewelry Box
How to turn your old ugly jewelry box into a pretty sewing storage box with sections. Upcycle your way into an organized home.
I found this old, vintage jewelry box at a thrift store. You need a vision of what you have in mind to makeover something like this into something useful. My need was sewing supply storage in my craft room. Wait until you see the process and how easy this organization project was.
This article contains affiliate links. Please see our Disclosure Policy.
My Sewing Storage Box Vision
Join me on my journey to Make A Sewing Storage Box From A Jewelry Box. It does require a little imagination and you will understand once you see what I started with.
I spotted this ugly beat-up old jewelry box in one of my favorite thrift stores several months ago. It was half price, only $3 cha-ching! I’m in the process of ‘decorating’ my craft room. I knew I could upcycle this piece into some cute sewing supply storage. So into my cart, it went. Yep, that’s right, I get a shopping cart when I go into my favorite thrift store, don’t you?
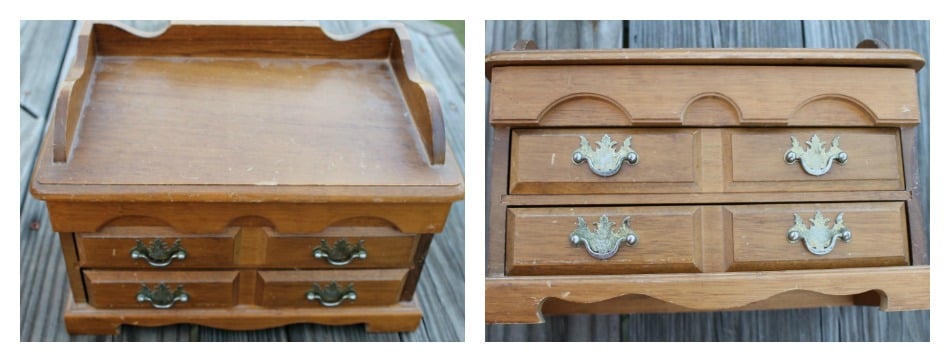

Oh my goodness, it’s so ugly and dirty. That gold felt on the inside was so very awful. I’m sure it was nice when it was new and it will be again.
Supplies for making a sewing storage box
- 1 ugly old vintage wooden jewelry box
- Drawer pulls, wooden thread spools
- Spackling like this
- Flat black spray paint
- Americana chalky finish paint, Innocence
- Spray Lacquer
- Mod Podge
- E6000 glue
- Fine grit sandpaper
- Decorative paper, Vintage black toile
Step 1
First I washed the outside and I do mean washed. This jewelry box is wood so it held up just fine to a good washing.
Then I removed the drawer pulls and that horrible yellow-flocked stuff masquerading as velvet. I was having flashbacks to the ’70s.
Step 2
Spackle the holes left by removing the drawer pulls. Removing the drawer pulls left small indention’s on the drawer fronts. I filled those in with spackling.
Allow the spackling to dry and carefully sand the area smooth. Then wipe off any dust remaining before painting.

Step 3 Paint
I used a total of three coats of paint on this project. Allow the paint to completely dry between coats if you are doing layers. I will be giving this storage box an antique finish which is why I am layering the colors.
The first coat of paint is a very light spray of flat black. I didn’t intend to cover well, just a good dusting of flat black spray paint.

The second coat of paint is pink chalk paint which I brushed on. This needs to be underneath for the antique finish to come later.
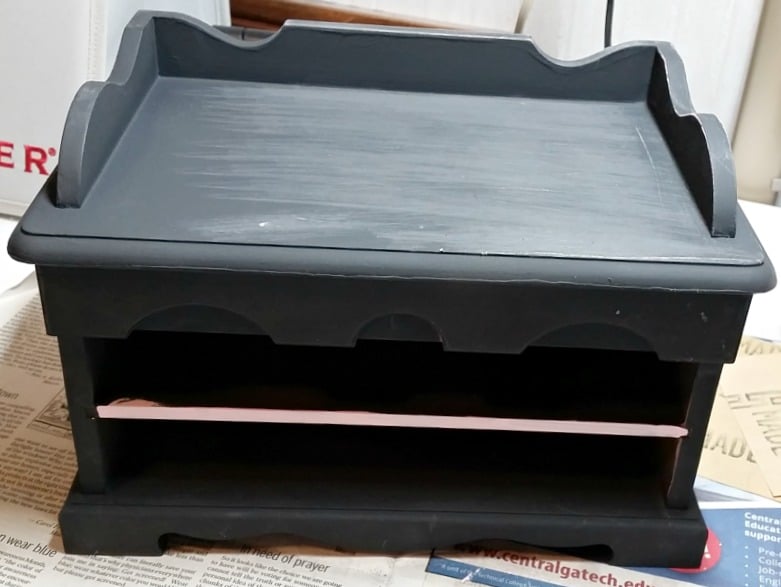
A final coat is sprayed on flat black. I was already beginning to sand the top when I remembered to snap a pic. I forgot to paint that little strip in the front so it’s in progress in this photo.
Step 4
Antiquing was next. No photos of the process. Sometimes when you get busy crafting, you forget to stop and snap pictures. I used a fine grit sandpaper and moved slowly. It was actually kind of fun.
The goal is to lightly sand paying special attention to edges so that you can get a hint of the pink paint underneath the black. Sanding also gives the piece that natural antique look that we all love.

Step 5 Line the drawers with paper.
Fitting and gluing paper to the drawers was next. I found this pretty toile paper and knew I just had to have it! It was only .44¢ per sheet at Hobby Lobby.
Cutting and fitting are a matter of trial and error. I used Mod Podge to glue the paper down. Let that dry for about 20 minutes or so before sealing it with a top coat of Mod Podge.
Mod Podge is one of my favorite mediums to work with. That is why I curated this list of 20 Mod Podge projects to do around the house.
TIP: Manicure scissors or small craft scissors like these are perfect for trimming the edges of the paper which poked out at the tops of the drawers.
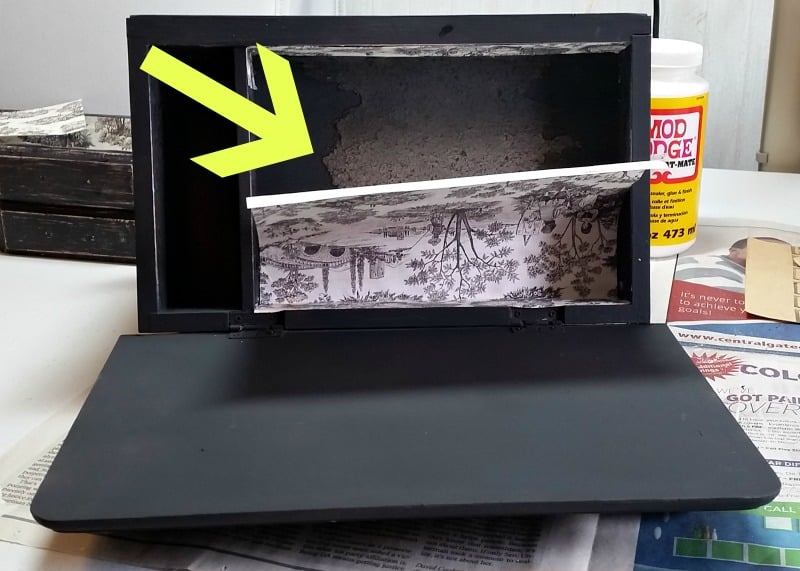
You can see in the photo above that all the bottom paper from the ugly yellow stuff wouldn’t come out. That area was covered easily.
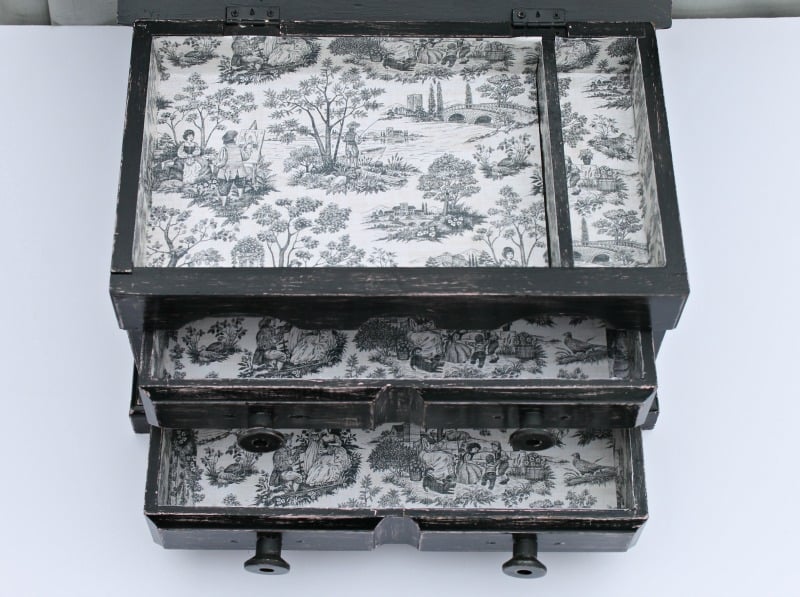
I added the paper to the sides first in every section.
Then, I began adding Mod Podge on the back side of each section and drawer and worked my way across to the opposite side. I painted the glue onto small sections of the paper at a time. I’m so glad I remembered to notice the design of the paper was facing forward before beginning.

Step 6 Drawer Pulls
Adding the drawer pulls. I had these cute little wooden spools in my craft stash. Because I intend to use my new storage box for sewing supplies, I thought these spools would be perfect drawer pulls.
It was pretty easy to cut them in half using a hack saw, like this. They received the same three coats of paint. I glued them into place using E6000.
Step 7
The last step was to spray on a coat of lacquer to seal the paint and make a nice looking finish.
I’m in love with the finished project. It was a lot of work with multiple steps but I love it!

This was my first experience with antiquing. I’m happy with the results and my choice of paint colors. This old jewelry box was easy to work with.

This jewelry box makeover turned out beautiful. I use it as a pretty sewing tools storage box in my craft room. If you wanted to return it to jewelry storage, that would work as well.

Prior to this project, the sewing tools in my new sewing storage box were in various places around my craft room. Hunting for them when I needed them was a real pain. That ugly old vintage jewelry box solved a problem for me.
I’m very happy with how this jewelry box makeover project turned out. I’m using it for some of the sewing supplies that I tend to reach for most often. That seam ripper and I are on a first-name basis anytime I sit down to sew, especially with this Super Mom Apron I made a while back.

More DIY Craft Room Storage Solutions
My DIY Framed Pegboard hangs in exactly the right wall space behind my craft table and holds quite a few of often used crafting supplies like that E6000 glue.
I came across some really pretty craft paper at a yard sale and had a great idea. Mayonnaise jars became pretty see-through craft supply storage containers and it’s at arms reach on my crafting table right now. Problem solved.
It took some imagination to make this Two Tier Spinning Craft Room Storage Tray and a trip to the thrift store. My Mayonnaise jar storage containers fit perfectly on it.
When you are short on space you go up instead of out, right? That is why my Sewing Pin Cushion is Two Tier also. You won’t even believe what it is made of and what the project costs.


Updated 1/11/2024


I am so in love with your makeover. I would have had a hard time seeing it’s future loveliness if I’d seen it in the thrift store. So glad you had the vision. Thanks for sharing at the #ThisIsHowWeRoll Link Party.
Ran across your post via a blog party. Really intrigued by the unusual finish/distressing of your box. Love it. Glad to find your blog. Am your newest follower.
Great transformation! Thanks for sharing at Dishing It & Digging It!
Wow – this turned out great!! Thanks for joining the DIY party!
This is such a clever makeover! And I love the new spool knobs you added – they are absolutely perfect for a sewing box! Great job!
Such a great transformation, I love the new handles and that paper inside is perfect.
I love recycling and your jewelry box came out a treat. Thanks for sharing on #overthemoon
Hi Shirley,
Getting some of my MM posts scheduled early! Sharing on Twitter Tuesday!
Kim
This looks really great! Your very creative!!!
It’s so sweet of you to say that Nikka. Thank you.
That really turned out so cute. I have a picture frame I’d like to use your ideas for. You got a lot of use out of the box after the fact. It’s a great way to get organized.
I’ve got some picture frames on my radar too Terri! Thank you.
I always forget to take pictures when I’m crafting so I feel ya! Love the paper you chose for the inside 🙂 I always hate how the foam of jeewlery holders get dingy!
I was rocking along doing pretty good with remembering the pics for a while but then I got involved and forgot. You are so right, those foam jewelry box insides leave a little bit to be desired, don’t they!
I like the make over. It looks new and cool. We all should try this for those who wants to save money.
Thank you Chris. It will be a nice savings for sewing storage for my craft room decor. It may take me forever to finish the craft room but I’ll keep working one project at a time until it’s eventually finished.
You did a great job with this. Its always great to find something so cheap that you can turn into something wonderful
Thanks Alexandrea. This project was a lot of fun! I’m itching to go find another one to do now! I’ve got a couple of things planned, if I can find the right items which mean more thrift shopping so Yay!
You did a fabulous job! I love the distressed look and you see these jewelry boxes all over the place for cheap.
Thank you Dawn. This was my first experience with creating the distressed look. I’m trying to use some pinks and black in my craft room so that’s where the color combo came from. I’ll be on the lookout for another jewelry box to flip.
Great job! I love that you did it all yourself and saved a ton of money by finding it at a thrift store!
Thrift store shopping is almost better than Target shopping! You never know what you might find!
This looks wonderful! Great idea to use it for sewing storage…so much nicer than sewing baskets.
That looks so amazing! DIY crafts and upcycling are my favorite blogs to read!! I pinned the pizza shelf as well 🙂 How do you become apart of a group like this? Facbook page or? I would love to become apart of it or learn more about how too 🙂
Email is brittany.beyourownsunshine@gmail.com
What a fun challenge! You did a great job, I’m going to go check out everyone else’s now!
That is so fun and awesome. That’s so cool that you teamed up with others to do this. Your jewelry box looks amazing.
It looks awesome, it doesn’t seem the same piece you found at the thrift store! The use of the spools is genius too!
Wow! What a great challenge! I love what you’ve done with it! Looks like an awesome link up too!
Love it Shirley!! I think it makes a great sewing box, and definitely digging the antiqued look. Plus those spool drawer pulls are too cute!
Thank you Amanda. This was such a fun project. Thanks for all your hard work organizing the challenge.
I LOVE that jewelry box, I want it! I love working on old beaten up things and giving it new life… I did it with my coffee table, and everyone loves what I turned in into…
That looks so cool! I love that you’re using it for sewing supplies. I’d love to give my crafting drawers a makeover.
This came out great! I love how you updated the inside as well as the paint colors!
WOW!! That is awesome! I would love to take up a challenge like this what a fun project!
I love upcycling! This is a cute redo, and I love the paper you chose for the inside. It turned out so cute.
What a genius idea to turn it into craft supply storage!
This project looks so cute post-makeover and it’s perfect for holding sewing supplies. I like the colors that you used for antiquing the piece and also like how you lined the drawers to make it extra pretty.
I’m a sucker for a good upcycle project! I love the pink coming through the black — with the antique finish. What a beautiful piece with new life!
Hey Shirley! Great job! i like that you used pink as the base color. I have a Pottery Barn Jewelry box my Daughter want to toss out I may use it for supplies. I had not thought of that! Thanks for the inspiration!
Holy cow, what a transformation! Nice job. 🙂
I love your pulls made out of the spools, and how you lined the box. This is a great makeover.
This looks really great! The paper insert really adds something extra to it. I’ll definitely check out others as well, great challenge for us vintage lovers!
Wow, that is amazing. You did such a great job with the re-do. What an awesome find.