How To Make An Authentic Looking Snowman Craft
Our Icy the Snowman Craft is probably one of my favorite crafts from this year. We have a strong affection for snowmen in our home. I made this Chilly the Snowman ornament several years ago as a gift. I have wanted to make one for myself ever since. Icy the Snowman is finally here! Chilly’s big brother!
Crafting is always a fun hobby. I tend to do more crafting during the holiday season, do you? I love my craft room year-round, but it might get a little messy during the holidays.
I will share a few more of my crafts with you at the end of this tutorial. Plus a link to my Snowman theme Christmas tree.

Supplies
- Three Styrofoam balls (I used these) (4″, 3″, 2 1/2″)
- Epsom Salts
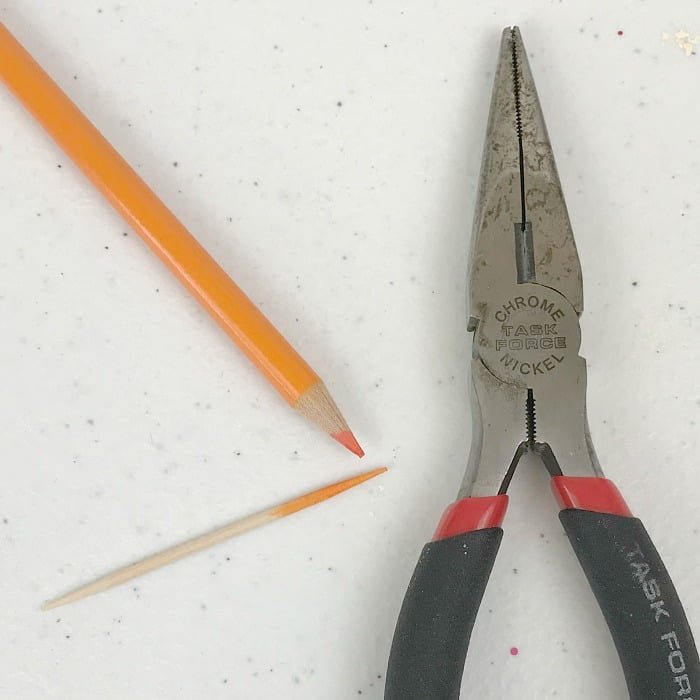
- Three round wood toothpicks (one for his nose)
- Mini black felt craft top hat
- Orange Color pencil
- One Holly Berry Button (Hobby Lobby)
- Glitter Ribbon
- E6000 glue
- Mod Podge
- Two black buttons
- Berry floral pick
- DecoArt Black Acrylic Paint
- Small piece of scrap fabric for a scarf
- Small piece of felt
Icy the Snowman is a fun home decor craft to make, especially if you enjoy working with Mod Podge. Let’s get started.
Directions
Step 1
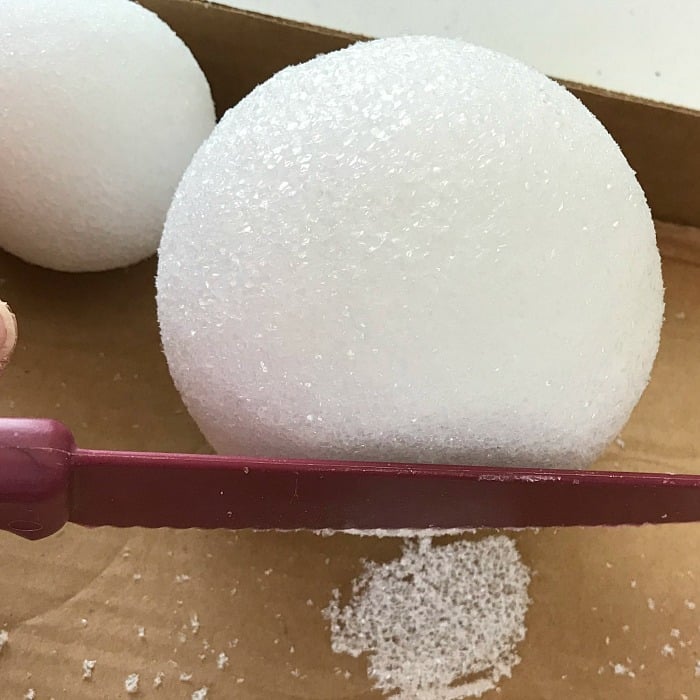
First, I sliced a thin piece to create a flat edge on the top and bottom of the two largest foam balls. Create a flat edge on only one side of the smallest ball for the head. Notice in the picture above how thin the piece I cut off is.
Step 2
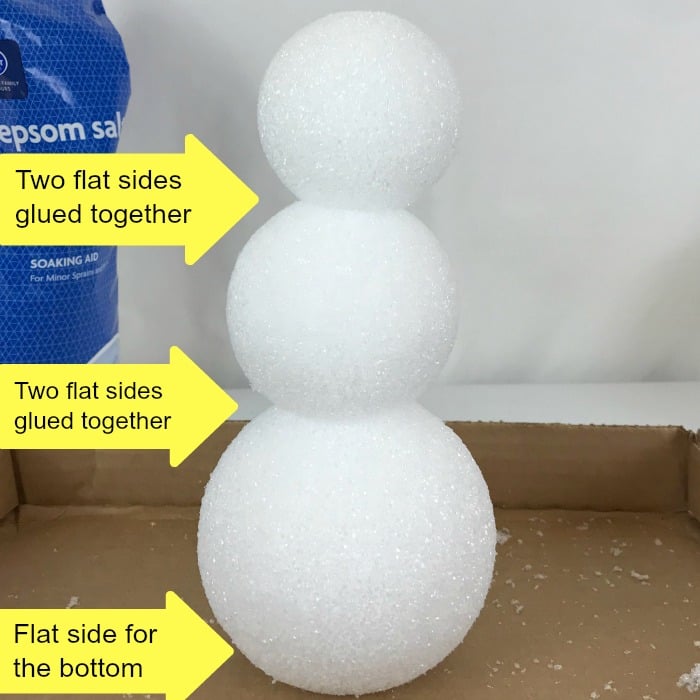
We need a flat bottom that will allow our snowman craft to sit alone and be used in a holiday decor vignette. The remaining flat sides allow the pieces to fit more comfortably, as shown in the photo above.
Use E6000 glue to attach the three styrofoam balls.

Step 3
Now I am ready to begin adding my snow, aka Mod Podge and Epsom Salts, which is the fun part for me. Because this step can be messy, I place my project inside a box to catch the snow as it falls.
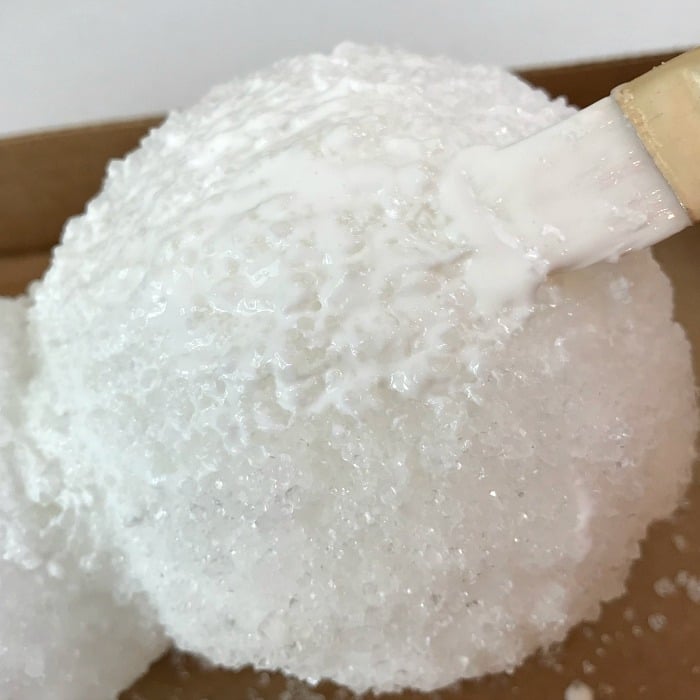
Mod Podge then Epsom Salts
I began at the top and worked my way down and around, painting on the Mod Podge with a brush in small sections. As each small section was painted, I would shake the Epsom Salt onto the glue using the cup shown above, allowing the excess salt to fall into the box.
Just as with any Mod Podge project, I kept a small cup of water handy to place my brush into from time to time. The salt crystals will build up on the brush and need to be removed occasionally. Clean the brush by swishing it around in the water and wiping it with paper towels.
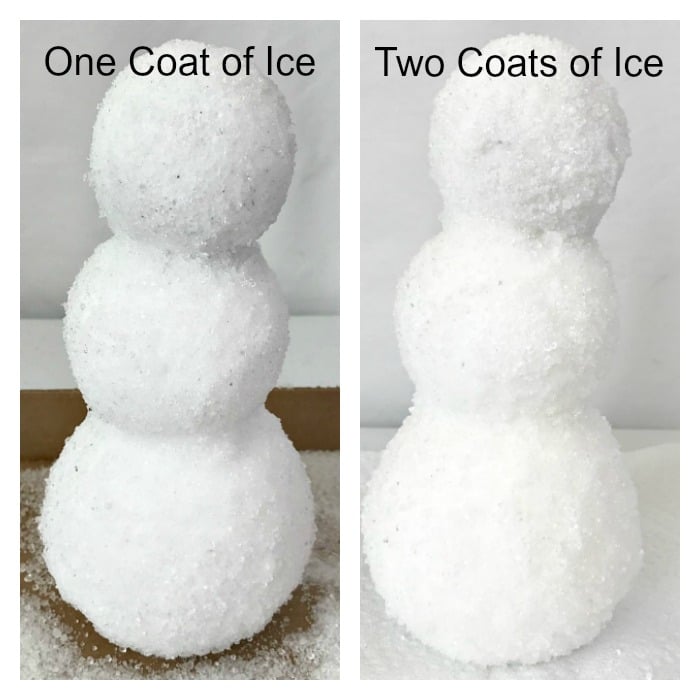
Step 4: A second layer of ice
Icy is made up of two coats of snow. Allow ample drying time between coats. I allowed mine to dry overnight before adding the second layer of snow.
After the second layer of snow had dried, I added two top layers of Mod Podge as a sealer, allowing a couple of hours drying time between each. These are the layers that give Icy his name.
Step 5: Making the Nose and Hat
The Nose
It doesn’t get much easier than a toothpick nose! I used an orange coloring pencil to color the end of the toothpick. Then I used my snips to make a clean cut the length I needed for Icy’s nose. His nose is simply pushed into place.

The Hat
I have a small arsenal of these mini top hats in my craft room. They come in handy when crafting Christmas decorations, especially snowmen.
Icy’s hat is my favorite thing about him. It is such an easy task.
- Cut the ribbon to fit the hat
- Glue the ribbon on using E6000
- Glue the Holly button on
- Create an icy edge by dabbing on Mod Podge, then sprinkling Epsom Salts into the glue
Step 6: Making the eyes
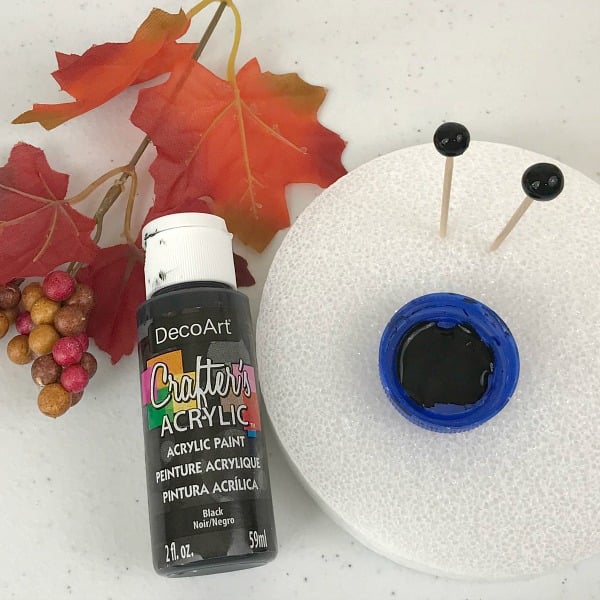
Icy’s eyes are a couple of little berries from a Fall floral pick in my stash. Using toothpicks, I simply rolled the berries around in a tiny bit of black paint. Then stuck them into a piece of Styrofoam to dry. His eyes are then attached using a dab of Mod Podge glue.
Step 7: The Scarf
All snowmen need a scarf. A red plaid scarf is perfect for Christmas.
The fabric I selected for his scarf is a scrap piece left from this Cone Christmas Tree craft. Both Icy and the tree will be a part of my Hot Cocoa Bar vignette during the Christmas season. It makes really cute home decor.
The edges of his scarf did get a little hem on the sewing machine, but that isn’t necessary. He would have been fine with a scrappy scarf.
Final touch
Because Icy is part of our decor, I glued a small piece of felt to his bottom to protect the furniture from scratches.

Storing the authentic-looking snowman ornament
We store our Christmas ornaments and decorations in clear plastic bins, like these. I wrap all delicate ornaments like Icy in bubble wrap. I prefer see-through storage bins with the clasp on the lids. It is nice to be able to see what is inside. The clasping lid makes the bins easier to stack and ensures the lid stays in place.

Snowman Theme Decorated Christmas Tree
More Christmas Crafts
How To Make This Elf Entrance Sign Christmas Tree Ornament

Craft this Red and White Pom Pom Mini Christmas Wreath Ornament

How To Make A Felt Poinsettia Christmas Ornament
DIY Mason Jar Lid Santa Ornament
Visit our Christmas Tree Decorating ideas page
Originally published Dec. 3, 2017


This little snowman is so adorable. And what a happy mistake to have the perfect hat for him. He is sure to be a decoration that will be enjoyed for many years to come.
Super cute Shirley!!
Tania
I love your snowman! He’s perfect! And I love Epsom salt. I’ve been using it to replicate snow for years and I love it better than anything I’ve ever tried. I need to make this to add to my snowman collection.
He is adorable – I JUST tried epsom salts this year (I know, I’m behind) for making jar lights. It’s amazing stuff! Great idea using the colored pencil to color the nose – would not have thought of that!