My Big Kitchen Pantry Remodel
Have you ever opened your kitchen pantry with dread because it is so unorganized? You need a jar of spaghetti sauce and you remember buying it but you simply cannot find it in that deep abyss we call a pantry. Sound familiar? We decided to take control of the situation and give our double door pantry a much needed remodel.
Having a well organized kitchen pantry space is one of the ways to manage the grocery budget better because you will stop buying things you already have. I hated opening my pantry door because that mess made me feel so lost. This pantry remodel was our weekend warrior project which went pretty quickly, all things considered.
My kitchen pantry closet is located in a small hallway just off the kitchen. The laundry room is right there too which is where we come in from the garage bringing the groceries into the house, which makes putting the dry goods away quicker. I love the size of the pantry because it is plenty large enough for us and not too big so I might be inclined to over-stock. It was driving me crazy because of the poor organizational design and those wire shelves.
This article contains affiliate links
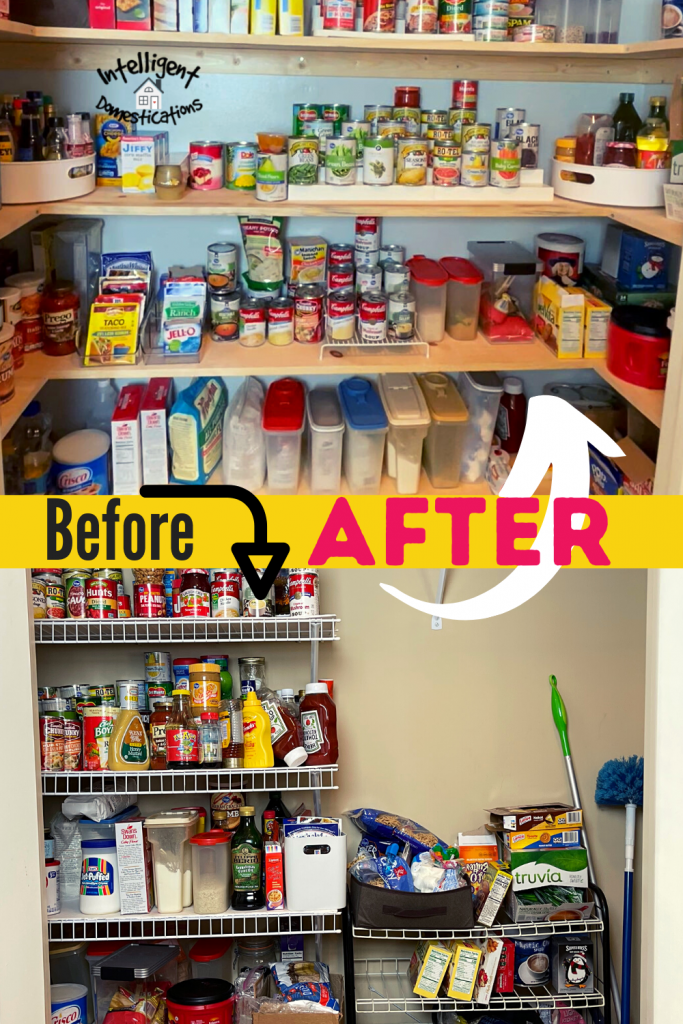
Our Kitchen Pantry Closet Problems

The biggest problem was that the shelves are too deep. We may be inclined to believe the deeper the shelf, the more stuff it will hold but it’s more like, the more stuff it will hide. Although it isn’t noticeable in this picture, I have multiple three tier racks for storing canned goods. Plus they are scattered but I also have quite a few plastic see-through storage containers. So there is an attempt on my part to make this pantry better organized.

The Solution to a better organized kitchen pantry closet

Our Solution to the problem
- Solid wood shelving
- Wrap the shelves all the way around to include the sides of the closet
- Make shelves less deep
- Relocate mop and broom to the laundry room and optimize that space for dry goods
- Add round turntables in corners to optimize space
- Add see-through storage caddy’s for small seasoning and mix packets
Where To Find Kitchen Pantry Organization Ideas
I did a whole lot of research on Pinterest looking for the best solutions which would work for me. Pinterest is a great place to begin because you can type in your search, hit enter and scroll through the pictures before clicking through to those which pique your interest.

There isn’t one solution, there are multiple things to fix, with the biggest being changing the shelving out to something more functional for us and utilizing all of the space for food storage. In my dream world, I actually have a Butler’s pantry but in reality, we’re simply going to make our pantry design based on reality and what works best for us.
Also be sure to research on Google and You Tube. We hit the jackpot on You Tube when my husband came across this video by Ana White. We are using her design.
Making Over the Kitchen Pantry Closet

First we removed everything from the pantry. To make that job easier, we used our convertible hand truck, like this one on Amazon. A box and a laundry basket fit perfectly so that we can move a lot more items at one time which we stored on the dining room table. It was fun, ‘shopping’ my dining room table for dinner ingredients for a few days.
Sort and Purge
I used this opportunity to sort and purge. Those deep shelves had well kept secrets, multiple items I was buying again and again which I did not need. Quite a few expired grocery items were found. I sorted like items together on the table so once I put them back into the pantry, they could be placed on the shelves together.

Tools and Supplies Used for Pantry Makeover
Supplies
- Shelf boards are 12″ Pine shelving boards available in various lengths
- Brace boards are 1×3, also available in various lengths
- Wall Screws are 1 1/4″ for attaching the brace boards to the wall
- Shelf screws are 2 1/2″ wood screws
- Spackling for patching holes in the wall
Tools Used
- Electric sander
- Stud finder
- Level
- Drill
- Miter saw
- Hammer
- Pencil

After the pantry was empty, it was time to take down the old shelving and patch all of those giant holes in the wall. Removing the old shelving goes fairly quick. You can repurpose those in your garage, attic or other storage area.
The holes in our pantry wall were quite large so we opted to sand them prior to filling them in with spackling. I am sure you could probably fill the holes, let it dry and then do all the sanding in one step if you like.

Yes, that is a lot of holes to fill in. Once the spackle is dry, it is time to sand again for a smooth wall prior to painting. This pantry indeed needed to be painted.

We saved a few bucks on the paint by using some leftover from when we painted our bedroom. It is supposed to be a very light gray but it looks light blue once dry on the wall. The lighter color is a great way to make the pantry appear brighter.

Once the paint is dry, it is time to get started adding the shelving. Use a stud finder. It is quite important that your screws go into studs since pantry shelves will be holding a lot of canned goods and other groceries which can be heavy.
You can add a brace onto the front of the shelves using the 1×3 board, but we wanted to avoid that if possible. In the end, we were able to avoid adding the brace on the front but if the need arises, we can always go back and add one.

We have finally reached the point where we can begin adding the wall braces followed by the shelving. Begin at the bottom and work your way up the wall. We used the smaller, 1 1/4″ wood screws, to attach the braces or brackets for the shelving. Be sure to attach them into the studs along the way for best support.

Determine how close together you want your shelves. We decided to space our shelves 15″ apart. It works great for us. Measure and mark the spot before attaching each brace.

Once all of the braces are added, it is time for the last part which is adding the shelving.

I cannot even tell you how much I love the corners in my new pantry closet! Bringing the shelving all the way around to the side walls has been such a blessing. It is kind of like having extra shelves. I had envisioned keeping larger items like small appliances we don’t use often on those ends but later decided to put more everyday items like coffee and pet food which makes those daily use items super easy access.

Once you get started adding the actual shelving, it goes pretty fast. There was some measuring and cutting to do for side shelves. See the above picture where we screwed the two boards together at an angle.

We now have five solid wood shelves which wrap all the way around the inside of the pantry closet. When I open the pantry doors, it is a joy and a pleasure now rather than the dread it was before.

My newly remodeled pantry feels like a small room because I can actually step inside and pick out the food items I need for cooking. No more deep shelves where things can hide and I keep adding them to my grocery lists when I don’t need them. Yes, that has happened.
I now feel like I have enough storage space for a well organized pantry. I was able to use of the plastic containers I already had efficiently. The tops shelves are great for storing paper goods and the floor space is used for bulk items we get from the warehouse grocery store. In the end, our new pantry shelving is a good design for us with functional storage solutions we were in need of.