DIY Chilly The Snowman Ornament
I am super excited today to share with you my DIY Chilly The Snowman Christmas Ornament. You can make your own with my easy tutorial!

I’ve chosen to name my creation, Chilly The Snowman, such a fun name, right! My Chilly The Snowman Christmas Ornament is in no way affiliated with any other Chilly the snowman. However, they could potentially be distant cousins.
My Chilly the snowman is an original creation which quite frankly was just so much fun to do! I hope you will use my tutorial to make your own Chilly ornament.
This article contains affiliate links. Please see our Disclosure Policy.
Table of Contents
- How to Make Your Own Chilly The Snowman Ornament
- HOW TO MAKE A SCARF FOR YOUR SNOWMAN ORNAMENT
- HOW TO MAKE THE SNOWMAN ARMS
- BUTTONS AND NOSE
- TOP COAT OF MOD PODGE FOR A COLDER LOOK
- MAKING THE EYES
- More DIY Christmas Ornaments
Supplies
- Three Styrofoam balls in graduated sizes (Dollar Tree)
- Mod Podge
- Epsom Salts
- 1 round party toothpick for the nose
- Small Buttons
- Small fabric scrap
- Floral pick stem
- 1 Toilet paper roller
- Elmer’s glue
Tools
- Hot glue gun and glue stick
- Sharp knife or box cutter
- Wire cutters
- Small paint brushes for the Mod Podge
- Large resealable plastic bag
- Black marker
- Orange marker
- Small Candleholder
How to Make Your Own Chilly The Snowman Ornament

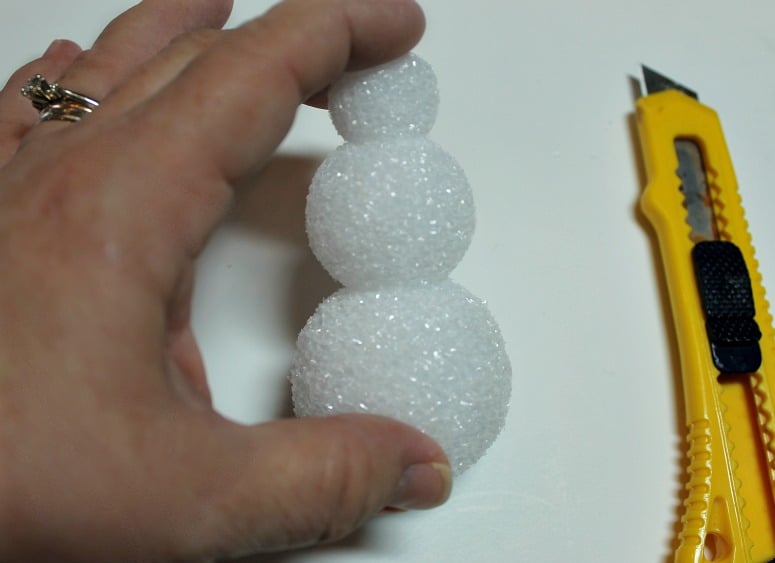
I picked up my Styrofoam balls at the Dollar store, one of my favorite places to find craft supplies. They came in a package with these graduated sizes so I was thrilled to find exactly what I needed. You will find these located in the floral supplies at Dollar Tree.
ASSEMBLE THE SNOWMAN
Take a sharp knife or box cutter and cut a very small recess into the largest and middle-size Styrofoam balls. This will allow each piece to sit well onto the next so he resembles a real snowman.
Glue the snowballs together
Glue the pieces together. I used Hot glue but which will easily melt those styrofoam balls if you are not careful. You could use e6000 if you prefer.

MAKING SNOW
Fill a large resealable bag with a generous amount of Epsom salts.
You have to work sort of fast with the Mod Podge. Paint the Mod Podge onto your snowman, don’t scrimp, and be generous with the Mod Podge.
After applying the Mod Podge, place your snowman into the bag with Epsom salts and toss around, gently, to cover him well. I painted the top two pieces first and then the bottom piece.
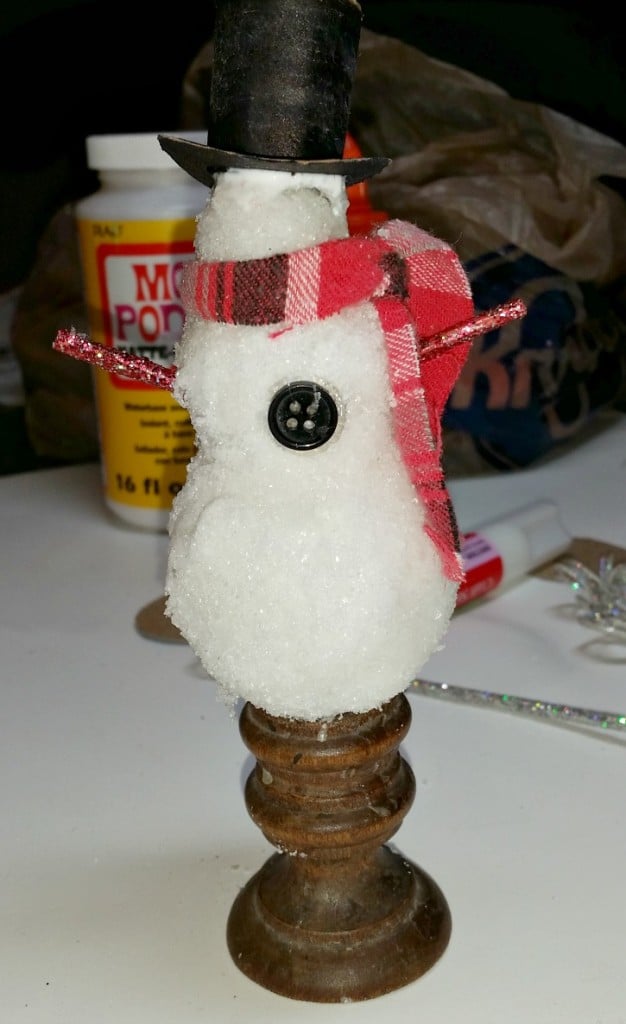
Notice in the above photo that I used a candle holder to sit Chilly on for drying time.
Allow Chilly to dry according to the directions on the Mod Podge. I allowed about an hour for drying time. It only took one coat of Mod Podge and Epsom salts for good snowy coverage. We will apply a top coat of Mod Podge later in the process which will make his snow glisten.

HOW TO MAKE THE TOP HAT
Wait for it, Chilly is wearing a toilet paper roller on top of his head!
Cut a small section of a toilet paper roller to create the main part of the hat according to the size you need. This piece should be tubular.
Now, unfold the remaining portion of the toilet paper roller out flat. Using the ‘hat’ as a template, draw a circle and cut out what will become the very top of the hat. Glue this top piece onto the tubular section with Elmer’s glue.
Now, cut a larger circle for the brim. Because the toilet paper roller was previously rounded, you will get that natural curve you want for the brim. Glue together. Allow about a half hour for drying time.
Color the hat black
Use a black magic marker to color the hat or you can paint it if you wish. The marker gave Chilly’s top hat the nice weathered look I was going for. I didn’t want it to be too shiny.
Adding ice to the hat
Dab a small stream of glue around the edges of the hat and dip it into the Epsom salts to create rings of ice on the hat.

HOW TO MAKE A SCARF FOR YOUR SNOWMAN ORNAMENT
I recently upcycled some plaid button-up shirts into envelope pillow covers. I saved all the scraps. Is that hoarding or being frugal? I’m going to say it’s being frugal because that’s where Chilly’s cute little plaid scarf came from.
I cut a piece from one of the plaid shirt scraps the size I wanted and tied it around his neck.

HOW TO MAKE THE SNOWMAN ARMS
Because Chilly is a Christmas ornament, he needs some bling, right? I cut the stems, using wire cutters, from a Christmas floral pic which was red and glittery.
Dab a little hot glue onto the end of the arm and stick it into place.
BUTTONS AND NOSE
Glue the buttons onto the front in the appropriate places. Mod Podge works like a charm for this step.
Color the nose
Use an orange marker to color the pointed end of the toothpick for the nose. Cut it to the appropriate size with the wire cutters which will give a good clean cut. Dab a little hot glue on the end and stick it into place.

TOP COAT OF MOD PODGE FOR A COLDER LOOK
Chilly is almost done but as you can see in the last photo, Chilly’s snow looks like wet icy snow, the kind we get in the southern U.S. every few years. We’re going to finish Chilly off with a top coat of Mod Podge to achieve this look.
I used 2 different brushes for the top coat. Consider this part of the process to be as if you are applying paint. Use a small brush to apply a coat of Mod Podge around the face. A word of caution here, the color of the nose will come off onto Chilly’s snow so try hard not to touch his nose.
I used the big brush to apply the top coat of Mod Podge everywhere else. It’s so cold outside that even Chilly’s cute little plaid scarf is frozen! I love that!
MAKING THE EYES
Use the black marker to create Chilly’s deep-set charcoal eyes and you are done!

Make a Snowman Ornament for your Christmas tree using Dollar store supplies. Chilly the Snowman with a carrot nose, buttons, and a flannel scarf looks adorable on the Christmas tree.


More DIY Christmas Ornaments
Mini Terracotta Pot Snowman Kids Christmas Craft
Make This Red & White Pom Pom Mini Wreath Ornament
Easy Painted Wood Slice Ornaments In Bright Colors
How To Make This Elf Entrance Sign Christmas Tree Ornament
Make This Easy Breast Cancer Awareness Ornament
FOLLOW Intelligent Domestications on Facebook/ Instagram/Pinterest
FOLLOW OUR CHRISTMAS BOARD ON PINTEREST

Originally published Nov. 11, 2015


What a cute snowman! This is a great project. Thanks for the tutorial.
This is so creative! You do have a crafty side 🙂 Thank you so much for helping with the #ornamentexchange!
Hi visiting you from the Ornament Exchange – I just LOVE snowmen and this guy is so cute. What a great tutorial, thanks for sharing I’m pinning this one for sure!
Oh gosh…this is so pretty! I love it!
Thanks for joining Cooking and Crafting with J & J!
This is so cute. Homemade Christimas ornaments become treasured, inherited items that live forever. I love this project and think I’ll give it a go. This would be also be great for a Brownie or Girl Scout Troop to try.
Hello I am a fellow ornament exchange participant popping by. Your ornament is so clever and cute!
Have a wonderful day.
So cute. I love snowmen. Not the cold though. Yuck. I think saving the scraps of your shirt is frugal and a great idea. I have so many scraps. You just never know.
So cute! We don’t get any snow here, so fake snowmen is as close as we get! I am participating in the ornament exchange too, and it’s fun to see all the ideas bloggers come up with!
That turned out awesome. So cute, I collect snowmen.
Take care!
The Chilly Dog likes your chilly snowman 😉 What a neat idea for making him sparkly!
So cute!! I love how realistic it looks.
I love snowmen, too, and this is adorable. Homemade ornaments are some of my favorites. And you hit it out of the park with this one. Love it!!