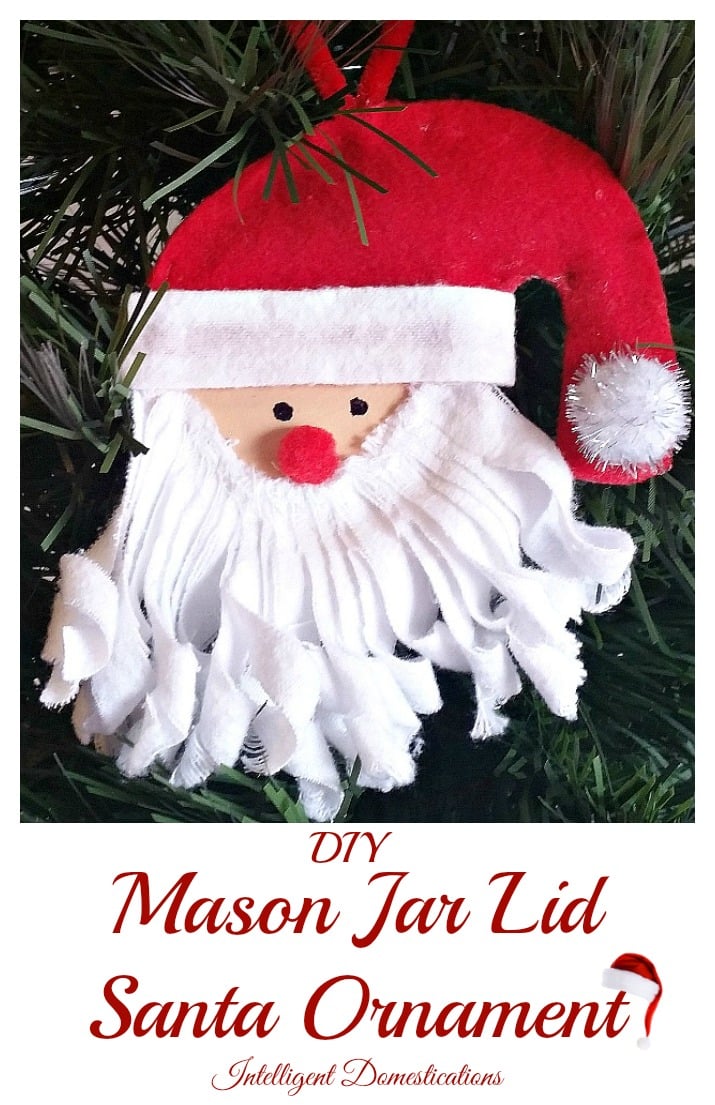
Mason Jar Lid Santa DIY Ornament
This Mason Jar Lid Santa DIY Ornament is a handcrafted project that will become a family heirloom and find a place on your Christmas tree for many years.
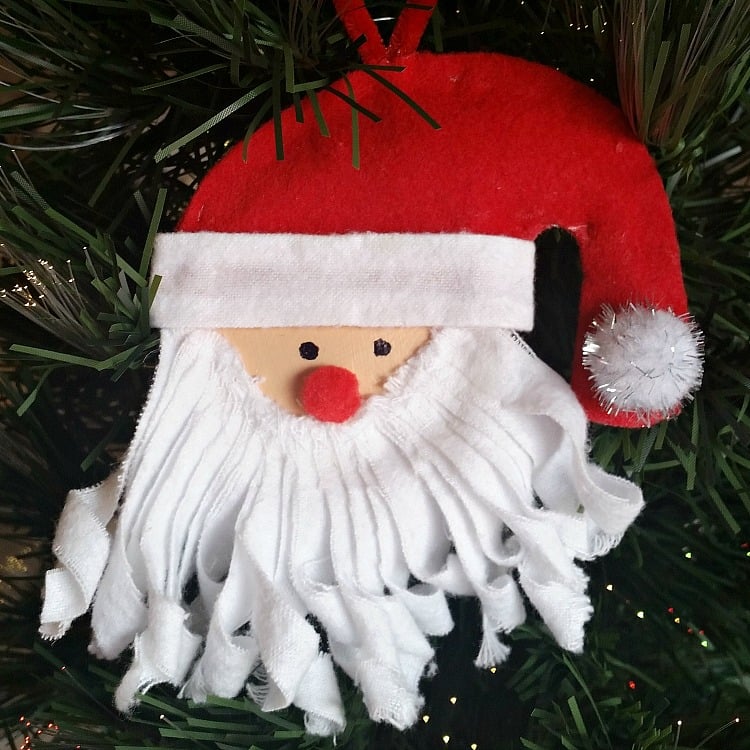
This a fun DIY Santa Ornament you can make with the kids for your Christmas crafting this year. Keep them for your tree or give them as gifts for friends, co-workers, or teachers.
This article contains affiliate links. Please see our Disclosure Policy.
If you love Santa Christmas decorations, you’ll want to see this adorable Santas Candy Sleigh Christmas party favors you can make for the kids.
Supplies
The supplies needed to make a mason jar lid Santa for your tree are all simple and common crafting supplies.
- 1 Mason Jar Lid
- Cotton or Fleece Fabric for the beard (I used fleece)
- Red felt square, like these
- 1 Small red pom pom
- 1 Large white and silver or blingy pom pom
- Black fine-tip magic marker, like this
- 1 Red craft pipe cleaner
- A small amount of pillow stuffing
- E6000 Glue
- Mod Podge
- Flesh-colored paint (I used Natural Beige)
- 1 Old Christmas card or a piece of Christmas craft paper
Directions
Step 1 Paint
Begin by painting the front of the lid several times allowing it to dry between coats.
Step 2 Cut the beard
While the paint is drying, cut your white fabric into small strips about 3.5 inches long and 1/2″ wide. They will be slightly shorter when curled.
Curl the end of each fabric strip the same as curling ribbon when wrapping gifts by pulling the side of closed scissors along the edge of each piece. Once it curls, it will stay that way.
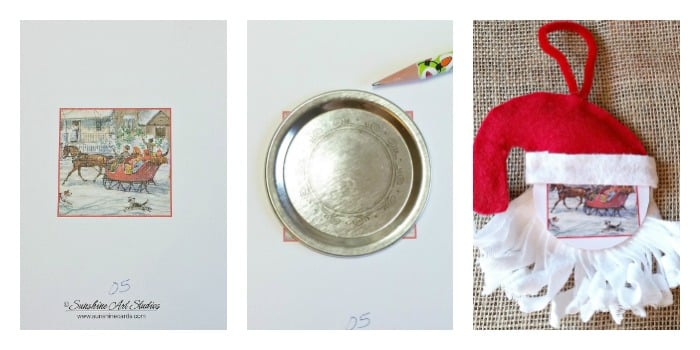
Step 3 Make the back of the ornament
Lay the lid onto your craft paper or old Christmas Card and cut a circle.
Glue it to the back side of the lid and coat it with one coat of Mod Podge which will preserve the paper.

Step 4 Make Santa’s hat
Fold the red felt in half so that when you cut the hat you’ll have two pieces. I drew my hat freehand with pencil and paper until I was happy with the size.
Then I cut it out and used it as a pattern on the felt. The goal for my Santa hat was a whimsical look with a long tail for the blingy pom pom. I also wanted to add the stuffing to create more of a 3D look rather than just a flat hat.
Step 5 Add hat to head
Use the E6000 to glue the hat, front and back onto the painted lid. You should have already added the card or craft paper backing.

Make a bead of glue as shown around the edges leaving an opening for the stuffing to fit into.
Be sure to glue the pipe cleaner on at the very top so you can hang your new Santa ornament on the tree.
Use clothespins or office clips to hold the felt in place while the glue dries.
Step 6 Add stuffing to plum the hat
Notice in the last photo, the gap on the bottom of the hat which is where you will add the stuffing. It’s a little tedious but you can do it.
After adding the stuffing, glue that last edge together and use the clothespins to hold it in place while the glue dries.
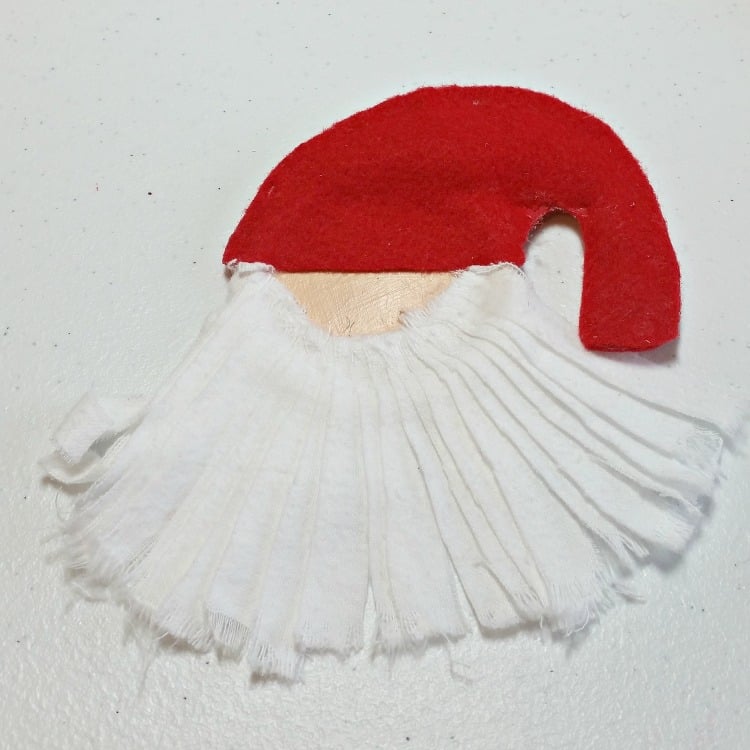
Step 7 Glue Santa’s beard onto his face
Now begin gluing the beard on using the E6000. Begin on the left and slightly overlap each piece to create fullness.
You will notice in the photo that I did not curl the beard until after I added it. I do not recommend this! Be sure to curl your beard pieces first. I left the edges ragged on purpose as I just love that look on Santa!
Step 8 Add the pom-pom’s
Glue on Santa’s red pom- pom nose and the blingy pom-pom on the tip of his hat.
Step 9 Give Santa his eyes
Finally, use the black fine-tip felt marker to make his eyes, and you are done!

You can make as many Mason Jar Lid Santa Ornaments as you need. This DIY Santa ornament makes a nice gift for teachers, co-workers, and friends. Make them for your Santa theme Christmas tree too.
The most important thing for you to use is your imagination to create your own Mason Jar Lid Santa Ornament.
More DIY Ornaments
Make an adorable Snowman Ornament I like to call my DIY Chilly The Snowman ornament
How To Sew A Christmas Bell Ornament (using a Vintage Pattern)
An Elf Theme Christmas Tree needs a blingy Elf Entrance sign like this. I found the unfinished wood arrow sign at Dollar Tree for this project.
Easy to paint and decorate Simple And Easy DIY Nativity Christmas Ornaments
How To Make A Felt Poinsettia Christmas Ornament
Mini Terracotta Pot Snowman Kids Christmas Craft

Updated Nov. 14, 2022


Oh I just love these!! 🙂
I would love for you to share this with my Facebook Group for recipes, crafts, tips, and tricks: https://www.facebook.com/groups/pluckyrecipescraftstips/
Thanks for joining Cooking and Crafting with J & J!
Cute craft! Mason jars and their lids come in handy for so many great ideas.
~Lorelai
Life With Lorelai
Your Santa ornament is so adorable, Shirley! I love how many ways Mason Jar lids can be used 🙂
A very cute Santa. I love using mason jars and lids for crafting. Thank you for sharing at the Snickerdoodle Create~Bake~Make link party!
Such a cute Santa. I love the curly beard, especially!!! I know your receiver would cherish it and would love hanging this onher tree.
That turned out super cute, Shirley, I love it! Great linky/hop, too! So much inspiration!
LOVE this!! What a great idea. (Now if I could just stop time so I could make all of these LOL!)
What an adorable Santa ornament! I know I have plenty of mason jar lids and this would be an awesome craft to make with the grandkids. I think I have everything except the white fleece. This is just too cute!
Ok, naughty me, I peeked! I can’t wait to get this adorable ornament!! Thank you for putting your crafty efforts into such a sweet gift!! 🙂
Santa is so cute. Nice idea to use mason jar lid as base. Thank you for linking up with us at #HomeMattersParty . We would love to have you again next week .
Love all of these homemade ornaments!
Shirley, he is soo adorable! Love his curly beard! You are too clever girl!
Kim
Santa Claus is so adorable. I love his beard and jolly face. It is a fun craft to use the mason jar lids. So cute.
Thank you Debra. He was fun to make. I can’t wait to make more for my family.
What an adorable Santa! He just makes me smile!
Thank you Michelle. He is a little cutie pie. I have a secret crush on Santa 😉
He’s so cute! I love the curly beard! I am participating in the Ornament Exchange too and I just stopped by for a visit!
Thank you Pam. I can’t wait to go see all the ideas and start making some new ornaments this year!
This is so adorable! I love the beard and the stuffed hat. I think I have everything to make this and will give this a try.
Thank you Erlene. I can’t wait to make more to share with my girls this year. I’m confident you have all the supplies in your stash.
I love this Santa! I also love that you made these with mason jar lids. Something I have plenty of.
Thank you Sherry. Mason jars and their lids and rings are so handy for so many different reasons, aren’t they!