
Decoupage Pumpkin Fall Vignette Craft
Creating a fun fall vignette is something I look forward to every year! This year I enjoyed several decoupage home decor projects using dollar store pumpkins and napkins!
The first fall vignette I created for a guest bath. It is the powder room most visited when we have guests in our home so I want it to look nice and neat with a touch of seasonal decor. I’ll show you some pictures of the entire room at the end of this post.

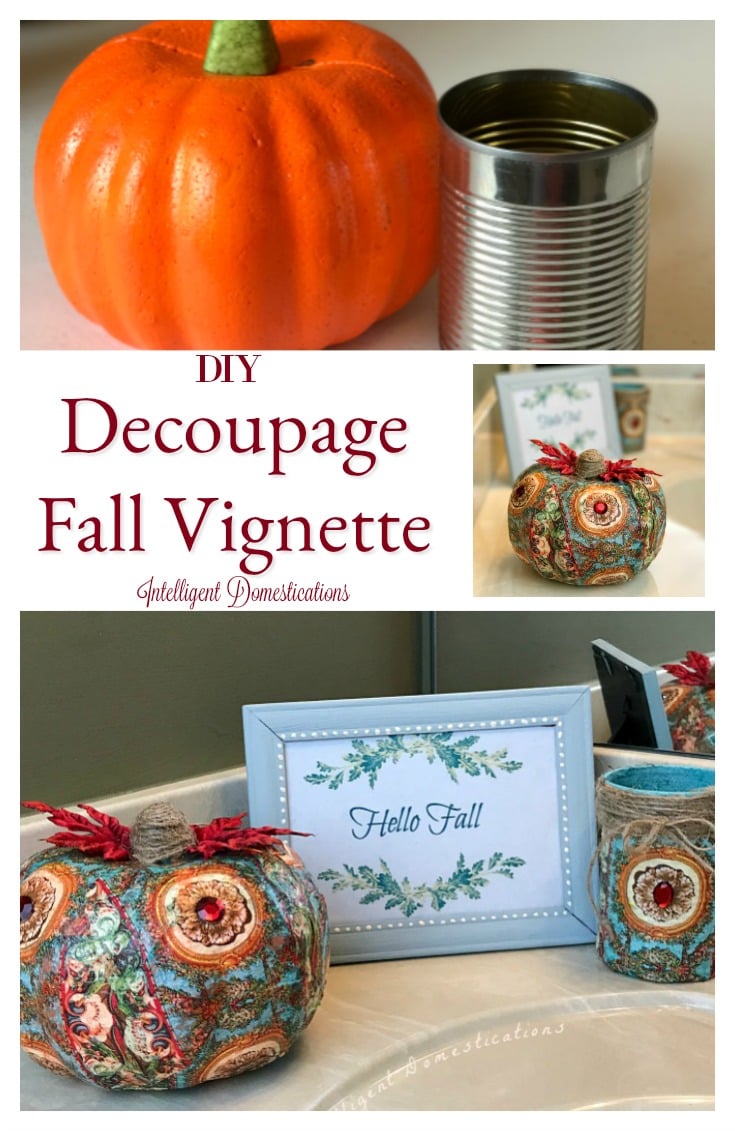
This DIY Fall Vignette consist of three projects; a decoupage pumpkin with a matching toothbrush holder container and a framed printable Fall quote. All three are simple fall crafts anyone can make for their home.
Supplies
- 1 Dollar store faux pumpkin, from Dollar Tree
- 1 Empty small soup can, washed
- Pretty Napkins, big selection on Amazon
- Mod Podge, from Amazon or Walmart
- School Glue (Elmer’s), from Walmart
- E6000 glue from Walmart
- 2 Faux Fall Leaves, Dollar Tree
- Matching stick-on jewels
- Jute from Walmart (also check Dollar Tree)

Step 1
Decorative napkins have several layers. Gently pull the layers apart before you begin the Mod Podge process. This will help to avoid bubbles.
It is as simple as gluing strips of the pretty napkin onto the sides of the pumpkin. Because the pumpkin is round, it is necessary to find a way to make the paper lay as flat as possible. I made cuts along the way to achieve this. It was actually fairly easy to keep the design in the napkin reasonable intact by making small cuts.
Step 2
Allow drying time before you begin to the sealing process. Mod Podge dries fast so won’t need to wait more than a few minutes.
I added three coats of Mod Podge on top of the napkins as a sealer. Mod Podge makes a great sealer. I like the shiny look it gives.

Step 3
Decorate the pretty pumpkin with jewels, leaves and a jute for a stem.
There are lots of faux leaves in my fall decor bin and I used a couple to add to the top of the decoupage pumpkin. First I pinned them down with a straight pin. Then I added a drop of E6000 glue.
School glue such as Elmer’s which dries clear worked great to hold the jute in place around the stem. As you can see in the picture, I added lots of glue then started wrapping jute. My thin jute came from the Dollar Tree.
The pumpkin turned out great. Everyone who comes in wants it and that makes me smile.
How To Decoupage A Can With A Pattern Napkin

The first thing I did was to lay the can on the napkin and pull the sides up to see if the napkin would reach all the way around. I decided to cut the napkin and match the pattern by hand. I wanted a pretty circle aligned center front so I could put a jewel in it to match the pumpkin.

It is necessary to make cuts across the top edge so it will conform when glued inside of the can inner edge. You will do the same thing on the bottom. I always decoupage the bottom surface also.
Smearing Mod Podge is one of my favorite things to do in the craft room. It is just a wonder that I don’t do it more often. Did you always love glue projects in elementary school? I did!
Everywhere you want the napkin to stick, smear some Mod Podge on with a paint brush then carefully add the napkin working in small sections until complete. Allow ample drying time which isn’t long with Mod Podge. Begin applying Mod Podge as a top coat for a sealer. I do not bother with other top coat sealers since Mod Podge works just fine for this purpose.

After about three coats of sealer, I added the stick-on jewel and the jute to match the pumpkin. Because we do not need toothbrush storage in this powder room, I used it to display a wash cloth which matches the hand towels.

My last project for this fall vignette was to create a Hello Fall printable and frame it. You are more than welcome to print one for yourself. This is not a fancy printable, it will print centered on the page. I minimized mine and cut it to fit in my 5×7 frame.

I had these red dollar store picture frames in my craft stash. They were last seen a few years ago in this Valentine mantle decor.
While the frame is really quite simple, I decided to add a little touch of flair by painting those little bumps Ivory. It took about three coats of blue craft paint to cover the red.

As promised, here is a peek at the powder room. It’s pretty standard. We love the cultured counters in both guests baths as well as all the bronze fixtures. All of the interior doors in our home are bead board. The door you see in the mirror goes to my craft room.
My little matching Decoupage Fall Vignette looks pretty on the vanity and I just love how it turned out.

The shower curtain was a T.J. Maxx find. We lucked up on matching towels and rug at Sam’s Club!
Notice the two paint sample strips on the wall on the right! The olive green paint is entirely too dark for our tastes and will be painted over soon. We purchased paint in a super light shade of gray for this room.
UPDATE: This guest bath did indeed get painted a very light shade of gray that is almost white. We love the change it made. The room is much brighter.
More of my DIY Fall Home Decor Projects
- How To Make A Scarecrow Wreath
- Teal and Orange Fall Tablescape
- DIY Scarecrow Candy Corn Centerpiece
- How To Make Hand Sewn Velvet Pumpkins
- Make Your Own Mason Jar Ring Pumpkin Using Washi Tape
- Fall Home Decor Tour 2025
More Home Crafts Using Mod Podge
- 20 Mod Podge Project Ideas
- Frugal Fall Décor with Mod Podge & Heat Bond
- Fall Napkin Dollar Store Pumpkin Makeover
- How To Make An Authentic Looking Snowman Craft
- Make A Sewing Storage Box From A Jewelry Box


Decorating with pumpkins is one of my fall favorites. Today I’ll be sharing your pumpkin decor at Merry Monday.
OMW Shirley, that napkin is stunning and the way you’ve added bits of bling take the whole look to another level. It makes it look like something you’de find in a Turkish palace. Lovely
Love the idea of decoupage for dollar store pumpkins. Those things don’t take paint well at all. I also love how beautifully it goes with your bathroom.
Saw this on the Fall Celebration link party. I love the pumpkins and can. Really turned out great. Thanks for sharing!
You find the most beautiful patterns to use in your decoupage projects. I’m including this in a pumpkin round-up.
What a pretty way to dress up a plain pumpkin! Your guest bath looks great for fall. Pinning to my fall decor board. Thanks for partying with us. Hope you have a wonderful fall weekend, Shirley!
Such a gorgeous pumpkin Shirley the pattern you picked it perfect
I am really enjoying the different pumpkin updates and your is really beautiful. Pinning.
These are absolutely beautiful!!….haven’t decoupaged in years…have to give it a go again. lol
Thank you Suzy. Yes, give it a go again! Mod Podge is just so much fun to craft with!