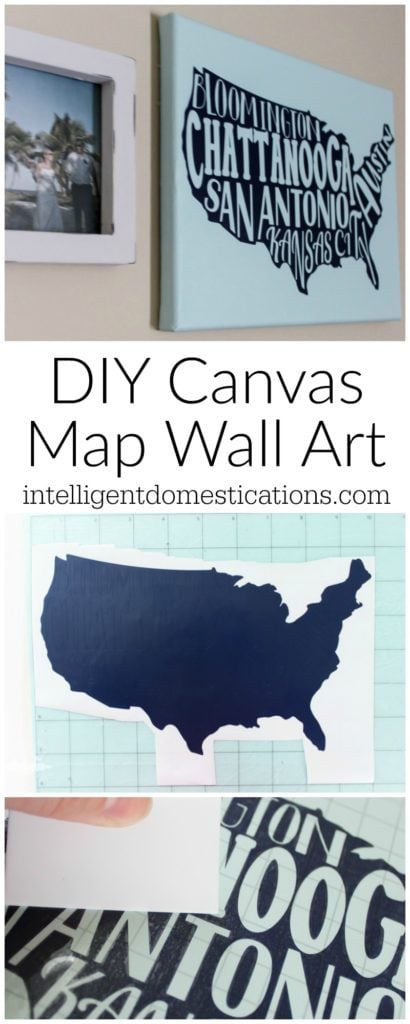
DIY Canvas Map Wall Art
Join me in welcoming my friend Amanda from The Kolb Corner today as she shares her DIY Canvas Map Wall Art project with us.
Hello! I’m Amanda, and I blog over at The Kolb Corner, where I share all things related to the home from DIY projects and seasonal crafts, to yummy recipes, meal plans and even decorating tips. My husband and I try to stick to a budget when it comes to keeping our home, so everything I make and share focuses on frugality. I was so excited when Shirley asked me to write a guest post for her! I have “known” Shirley for a few years now, as a fellow blogger. She wanted to introduce her readers (you!) to a new way of crafting by having me share a project I made with my Silhouette Cameo.

When Shirley mentioned doing a project with the Cameo, the wheels in my head immediately started spinning. I came up with several projects I could share, and after a little bit of consideration I narrowed it down to this customizable DIY Canvas Map Wall Art. I am currently working my way through a mini Master Bedroom makeover and needed another piece to fit the gallery wall.
My husband and I have moved several times and have hopefully settled on our permanent spot (Kansas City area). I really wanted to make a piece of art that commemorated all of the places we’ve lived, but still be fun and a little funky. This piece is personal to my husband and I, yet it’s easy enough to change it around to fit your story.
Affiliate links are included for your convenience.
DIY Canvas Map Wall Art
Items You’ll Need:
- Silhouette Cameo
- Blank canvas (I used an 8″x10″ because that’s the size I needed for the space)
- Oracle 651 vinyl in color of choice
- Paint in color of choice
- paint brush
- transfer tape (optional but helpful)
- weeding tools (optional but helpful! tweezers work in a pinch)
Start by downloading this cut file of the U.S. (minus Hawaii and Alaska).
If you are wanting the canvas to be painted, go ahead and paint it now so that it can be drying while you design the map art.

Next open up the Silhouette Design Studio, and import the cut file from wherever you downloaded it to. Set the cut dimensions to the size you will be cutting at.

Next, type out each word you want to go into the map. I chose the cities we’ve lived in, but you could choose any words really as long as they tell your story. Some ideas might be where you met, where you were engaged, where you were married etc. Find the font(s) you want to use for each word. I liked the idea of using several fonts to really make it pop. Keep in mind when you are choosing fonts, to keep the fonts thick or bubbly. You don’t want to choose something very light, or one that has a lot of thin strokes. When you peel up the vinyl those thin areas are more likely to rip or stretch out and that will make your map canvas art look skewed.
Arrange the words how you want them to look. For mine I took it one step further and even manipulated individual letters using the modify tab and detach lines.

Now that everything is arranged they way you want, it’s time to cut it out! Make sure you do a test cut first to make sure all of the settings are correct.

Once the design is cut onto the vinyl, remove it from the cutting mat with the backing in place. Then weed out the vinyl that won’t be going onto the painted canvas. This will be the large areas surrounding the map (shown in picture above), and then each letter inside the map.


When everything is weeded out correctly, cut a piece of transfer tape the same size as the map. Peel the backing off and place the tape sticky side down onto the vinyl. The transfer tape will pick up the vinyl design in place so that it stays together. This is especially helpful for all of the little pieces, like the inside of the O’s and A’s. You can use painter’s tape or washi tape as well.

Peel the backing off of the vinyl carefully–the vinyl should stick to the transfer tape. Transfer the vinyl and tape over to the canvas, which should now be dry. Arrange the vinyl how you want it on the canvas, then press it down firmly being sure to smooth out any bubbles. A credit card or other similar flat plastic works great for this.

CAREFULLY peel the transfer tape up, being sure the vinyl sticks down to the canvas. It may be a slow process, but once you have the transfer tape peeled up you will be so happy with your new DIY Canvas Map Wall art.

One last step that isn’t a requirement would be to use a sealer over the canvas. I chose not to seal mine, but you could use an acrylic sealer like this one over top just to make sure the vinyl stays put. I like using Oracle 651 vinyl because it really sticks to whatever surface you are using.

This DIY Canvas Map Wall Art was the perfect addition to my gallery wall and helped to fill the one last space I needed! Plus the colors are perfect for our room, but they still make the art stand out. What do you think??

If you are looking for more Silhouette projects, be sure to check out my Silhouette Crafts page for more inspiration.
Please be sure to visit Amanda at The Kolb Corner and see the completed gallery wall project here.
More crafty decor ideas for your home


I love this, it’s really nice! Thank you Shirley for attending the #WednesdayAIMLinkParty. I shared your post on Facebook, Google+, Pinterest, and Twitter.
You’ve made it look so easy! Thanks for sharing at the Pleasures of the NW’s DIY party!
Oh this is too cute! 🙂
I would love for you to share this with my Facebook Group for recipes, crafts, tips, and tricks: https://www.facebook.com/groups/pluckyrecipescraftstips/
Thanks for joining Cooking and Crafting with J & J!
Wow, I love your canvas map. You did a great job. Thanks for sharing at Over The Moon Party. Hope you come back next week so I can stop by again. I hope you will stop by Thursday Favorite Things tomorrow.
Hugs,
Bev
This is such a clever idea! It would be a great way to remember all of the places you have traveled. I can’t wait to try it out!
That looks so cute!! I was wondering how long did it take you take of the letters?
Hi Jacqui! With the weeding tool it didn’t take long at all! Maybe about 5 minutes tops.
this is such a thoughtful and creative DIY – i really love it! though not sure my unsteady hand could work it out 🙂 hahah – I also love the idea of representing your home/home state -especially as a native New Yorker and writer of a NYC focused site especially, I love representing, so this would be perfect for me! 🙂 thanks for sharing and inspiring 🙂 xx Bee
I buy SO much art like this for my daughters room and I had no idea I could be doing it myself! Definitely going to give it a go next time I have some hours spare to sit and do it properly 🙂
Louise x
I love this idea! Although my husband and I would have a very boring one. We’ve only lived in 3 places together.
That is amazing looking and I can’t imagine mine coming out remotely as professional looking! I would love to try, though, because we travel so much and this would be a great memento.
This is awesome. Very simple and fun. I would like a one that said Florida or NYC.
My goodness! I’ve invested a small fortune on vinyl wall art. I didn’t even know you COULD do it yourself. I love that you put this on a canvas, too! You did a great job.
This is such a cute idea! I have never thought to make something like this, I love getting crafty. I also really like the blue you used in this, so fresh feeling!
This project is so clever and cute! I love fun memory talking pieces to remind us of our travels.
That is so cool! We spent a year on the road traveling to over 20 states. It would be fun to commemorate in such a way. Thanks for the idea!
🙂
Traci
Oh wow! I’m sure that was a most memorable experience. I like Amanda’s idea. Hope you get to make one for yourself.
What a great project to make with a Silhouette. I’ve always wanted to create something similar to this and will have to see if I can create something like it.
Didn’t she do a fabulous job. Her skill level is impressive. I want one of those!!
This is really cute! I would make one for each state or country we have visited.
I just love how it turned out. Such a fun piece of decor.
I tried canvassing for the first time and really like the result of it. Looks so nice on my wall.
I’m going to try to be a good girl so Santa will bring me a Silhouette and I can do this cool stuff for my home!
This is so cute! I would love to devote a wall with places each year we visit.
Isn’t it such a fun idea to decorate with reminders of trips like that. I love it.