How To Decorate A Birdhouse with Paint
Painting Birdhouses is a fun and easy birdhouse craft for any time of the year. I am sharing How To Decorate A Birdhouse with Paint including the stencils I used and my favorite paint to use when crafting.

You can decorate a wooden birdhouse with a combination of acrylic paint, stencils, and decoupage.
You can pick up small wooden bird houses to paint at most any craft store. I found a nice selection of them at my Michael’s store a while back. Shop online at Michaels here.
I got the whole family involved in birdhouse painting ideas and let everyone paint a birdhouse kit using their own creativity. We took turns in the craft room and it was such family fun.
This article contains affiliate links. Please see our Disclosure Policy.
Table of Contents
- My Birdhouse Decoration Inspiration
- How To Paint and Decorate A Birdhouse
- More Birdhouse Craft Ideas

We are a birding family who enjoys creating ways to invite feathered friends into our yards. Painting birdhouses is always fun and it allows creativity to come out in all of us.
I picked up a few unfinished birdhouses to paint and let everyone chose the one they liked the best.

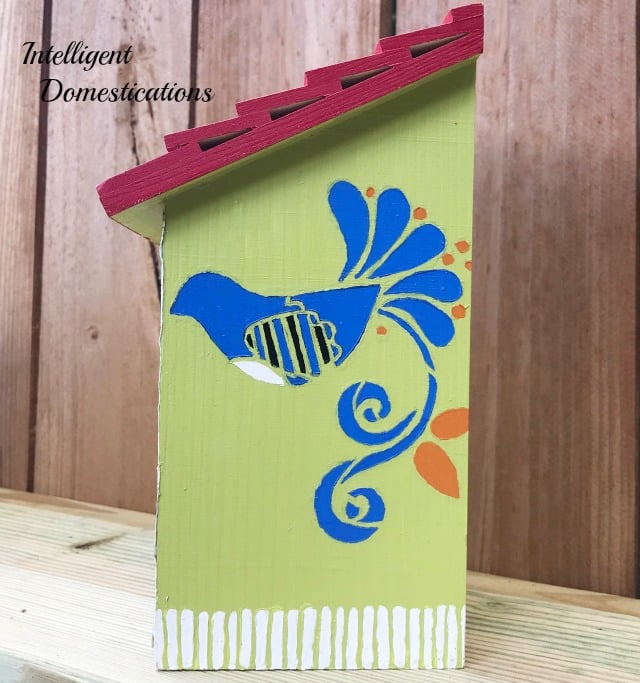
My first painted birdhouse to go on our outdoor shelf is this one with the slanted roof I found at Michael’s. Standing there in the store I knew in my heart that the roof needed to be red!
My Birdhouse Decoration Inspiration
Folk art, and specifically the kind of folk art you see on display at House of Blues restaurants. It is called Outsider Art which basically means, self-taught and not mainstream. For me, I like it because it isn’t ‘perfect’. The colors are typically deep and the paint is often thick.
If you have never been to a House of Blues, the food and music are both good. Try their cornbread!
How To Paint and Decorate A Birdhouse
Paint colors
What color should you paint I birdhouse?
If your goal is to attract more birds to your yard, then use natural earth tones that will create a camouflage habitat area. Birds are not particularly picky about the color but do care about safety from predators when they are laying eggs which is why earthy tones are good. That being said, you can use any color you like. I am using bright colors for my Birdhouse shelf on my back yard fence.
Paint colors used on the butterfly stencil are all from the DecorArt Americana Decor Outdoor Living collection including; Sunset (orange), Iron Gate (Black), and Succulent.
Colors for birdhouses can be as varied as the sky. Choose the colors that make your heart smile.
The red roof is called Ladybug also, from the DecoArt Outdoor Living collection.
STEP 1
Decide your birdhouse colors. You can paint a birdhouse literally any color your heart desires.
I began by adding a primer coat of white to the unfinished wood birdhouse. Then I added two coats of that beautiful bright red color to the roof of my birdhouse.

STEP 2
Next, I painted the outside with a lively shade of green called Succulent, from the DecoArt Outdoor Living collection.

STEP 3
I decided to add some birdhouse artwork to give it some character. I used stencils and decoupage for this process.
First I had to adhere the stencil to the side of the birdhouse.
Stencil Tip
Repositionable Stencil Spray Adhesive is the way to go when using stencils. A word of caution, don’t get in too big of a hurry and not let the glue dry! If you do not wait on the glue to dry, it will not adhere and the stencil will bleed. Does that sound like the voice of experience?

I used the Birds and Butterflies, a laser-cut Stencil, from DecoArt. It comes in one long sheet as seen above.
You can cut each design section apart making them all separate pieces and easier to fit onto your surface.


The paint colors for the bird stencil also include DecoArt Americana Outdoor Living Morning Glory (blue) and Iron Gate.

STEP 4
Adding the map to the front was the last step.
For this process, I used outdoor decoupage. If you look closely, you may realize this is a map of the interstate system in Georgia. It’s rather old and was falling apart having been used for many years by my family.
How fun to add a map to the front of a birdhouse since we have no idea how far those creatures are traveling each day.
Adding the map
To add the map, I cut it to fit by first cutting the section I wanted to use into a small enough piece to fit over the front of the birdhouse.
Then I used a sharp straight-edge blade to cut the map along the edge of the birdhouse.
Cut the hole by making a small center cut using the sharp straight edge then create slits like cutting a pie. You will fold those into the hole and glue them down using the decoupage.
TOTAL TIME
My total time invested in this project was really about 3 days because I was in no hurry. You could easily do it one day with paint and decoupage drying times included though.
This birdhouse is part of a larger project to attract more birds to our backyard. We are creating a birdhouse shelf where we will continue to add more DIY birdhouses from time to time.
I hope you have found some ideas for painting a birdhouse for your yard.
More Birdhouse Craft Ideas
- How To Make Milk Jug Bird Houses
- Easy Homemade Bird Suet Recipe
- Patriotic Repurposed Coffee Can Bird Feeder
- DIY See Rock City Barn Birdhouse

How To Decorate A Birdhouse with Paint
How To Decorate A Birdhouse with Paint and Stencils.
Materials
- One unfinished wood birdhouse with a faux tile slanted roof
- DecoArt Americana Decor Outdoor Living Ladybug
- DecoArt Americana Decor Outdoor Living Succulent
- DecoArt Americana Decor Outdoor Living Sunset
- DecoArt Americana Decor Outdoor Living Morning Glory
- DecoArt Americana Decor Outdoor Living Iron Gate
- DecoArt Americana Decor Outdoor Living Picket Fence
- DecoArt Americana Decor Stencil Birds and Butterflies
- Outdoor Decoupage
- Old road map
- Repositionable Stencil Adhesive
Tools
- Stencil brush (Round foam)
- Paint brushes
- Decoupage brush
- Sharp straight edge razor tool
Instructions
- Paint a base coat onto the birdhouse and allow to dry completely.
- Paint a second coat and allow to dry.
- Paint the roof and allow to dry then repeat. Allow to dry before moving on to the next step.
- Follow the instructions on the Repositionable Spray Adhesive to adhere your stencil onto the side of the birdhouse. (Do only one side at a time)
- Using the foam stencil brush, dab your paint onto the brush then wipe most of it back off before painting inside of the stencil. Allow to dry.
- Repeat step 5 until your paint color is as deep and well covered as you desire.
- Remove the stencil.
- Follow Steps 4-7 to add the stencil design to the opposite side of the birdhouse.
ADDING THE MAP
1. Select the area of your map that you want to use on the front of the birdhouse.
2. Cut the map down to a workable size so that you can lay it onto the front of the birdhouse to cut it to fit.
3. Lay the map into your desired position onto the front of the birdhouse and using the sharp straight edge cutting tool, cut it to fit along all four sides.
4. Beginning at the top of the birdhouse just under the roof, apply decoupage onto the birdhouse and carefully place the map onto it smoothing as you go.
5. Continue to apply decoupage and smooth the map onto the front of the birdhouse until the front is covered.
6. Using the sharp cutting tool, create a slit over the hole.
7. Now carefully slit small sections like cutting a pie until the hole is completely open. Do not remove the 'pie sections'.
8. Fold the pie sections into the hole and secure them in place with small amounts of decoupage.
9. Allow about 20 minutes for the decoupage to dry
10. Add a top coat of decoupage. Allow to dry then add another top coat.
Notes
Follow the drying instructions on the outdoor decoupage. Most dry in about 20 minutes.
Fitting the map in place sounds harder than it is.
Recommended Products
As an Amazon Associate and member of other affiliate programs, I earn from qualifying purchases.

Original publication 6/19/2019


It’s really interesting that you’ve made a birdhouse out of a coffee can before! It’s awesome how you can recycle your everyday trash into a home for birds to live in! Things like milk jugs and coffee cans would probably just waste away in the dump if we don’t turn them into something else anyway.
Your decorated bird house turned out so cute! Love the stencil and the addition of the map, too. The colors are so vibrant for summer!
Shirley these are super cute and how fun that the family was helping you paint. I love that. I have stopped adding birdhouses and bird feeders to my yard because we have so many cats. I feel like I am setting a trap for the poor birds. These are lovely and I bet it is fun to watch them.