DIY Solar Directional Deck Lighting
Our new Solar Directional Deck Lighting was easy on the budget and probably one of the easiest DIY home projects I’ve ever done.

I’ve paired up with 19 other talented ladies to bring you a monthly Thrift Store Decor Upcycle Challenge. Each month we will create a new home decor piece from an item(s) we’ve found at a thrift store, yard sale, resale shop etc. There is no budget or specific theme so we are free to let our creativity run wild!
Meet the Hosts

Amanda | The Kolb Corner Chelc| Inside the Fox Den
Erlene | My Pinterventures Kim | Made in a Day Sara | Twelve on Main
Debra | Shoppe No. 5 Shirley | Intelligent Domestications
Marie | DIY Adulation Lindsay | Crazy Organized Michelle | Our Crafty Mom
Julie | Live From Julie’s House Dru | Polka Dot Poplars
Maureen | Red Cottage Chronicles Pili | Sweet Things Channell | Hobnail House
Colleen | Life on Kaydeross Creek Ann | Duct Tape and Denim
Paula | Virginia Sweet Pea Sherry | Savvy Apron Stacy | Anastasia Vintage
You can also follow our board on Pinterest for more upcycled decor inspiration!
DIY Solar Directional Deck Lighting
There is always a sense of satisfaction when you can DIY home decor on a budget and love the end result. It’s all the better when it’s a thrift store find!
Supplies
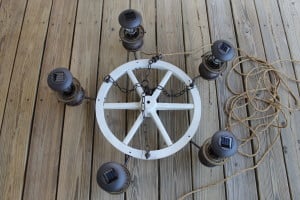
- 1 thrifted brass candle wall sconce ($1.50)
- Black spray paint
- E6000 glue
- 3 Solar lights (these came from Dollar General for $3.50 each)

While browsing through one of my favorite thrift stores recently, I spotted this old brass candle sconce. I was in solar lighting mode because I was shopping for a particular lamp for another outdoor project. With solar lighting on my mind, I knew exactly what to do with this old brass candle sconce. Would you believe it was only $1.50!! That’s why I love thrift stores.

I gave it a good cleaning and spray painted it black. It took me pretty much all of one day to spray paint it because of the narrow lines. I’ve learned to spray paint in short burst to keep from causing the paint to drip. There were multiple trips to the deck to paint an area, let that dry and paint more areas. I’m not complaining because this was such an easy project.
We use whatever we can when we are in crafting mode, don’t we? I used three rolls of tape to stand it up so I could move on to the next step back in my craft room.

I took the tube intended for staking the solar lights into the ground and cut three small sections as close to the same size as possible. This was easy to achieve with a hack saw.
The purpose of the tube sections is to raise the solar lights up enough to be able to turn their direction if we wanted to. Placing them into the candle holders made them sit flush so they wouldn’t turn. It also caused them to fall out too easy. I didn’t want to glue them into place because I want to be able to change the direction of the lights while sitting on the deck in the evenings.

I used E6000 glue to attach those small tube sections into the candle holders. You can see in the photo above they don’t poke up much, just enough.

Our new Solar Directional Deck Lighting is located near the steps. The black color matches the decorative balusters on the deck rails.

It only cost about $12 and was probably one of the easiest DIY home projects we’ve done. We created a Solar Chandelier for our front porch which we are still using. I also found an old lantern at an estate sale and repurposed it into a solar light for our front porch.

As I mentioned, I have one more outdoor solar light project that I’m working on now. I hope to share that project in the next several weeks.
We are very happy with our new solar deck lighting and especially love how frugal the project was.
Please be sure to stop by and visit the rest of the thrift projects listed below. There is a great deal of talent and ideas to be found.

Be sure to check out all of the other creative upcycle projects my fellow bloggers have come up with!
Subscribe to our weekly newsletter
Follow our Summer Fun Board for tons of Fun ideas
More from our site


I have some wall sconces similar to yours. They were from my mother in law and had no idea what to do with them. Now you gave me an idea!! Yours turned out really cool and I’m sure you use it a lot in your deck.
Loving this project you did! I am never going to pass up old brass sconces again at the thrift store.
Great job and thank you for linking up at the DI & DI Link Party.
This turned out SO neat! 🙂
I would love for you to share this with my AMAZING Facebook Group with over 300 Members to share easy craft projects and recipes: https://www.facebook.com/groups/pluckyrecipescraftstips
Thanks for joining Cooking and Crafting with J & J!
Wow Shirley I am blown away by this! Love You are too clever girl! I need one for my staircase! Pinnned & sharing on FB! #merrymonday
This is a great DIY project for the deck, Shirley. I love that you sawed the tube into three pieces and used them so that the lights could be turned in whatever direction light is needed. What a fun project! I laughed about the spray paint, because whenever I spray paint, I’m constantly making trips back and forth to put that next coat on.
Omgee, I LOVE this idea! I want to create some to go around our backyard. Do they give off much light?
This is great! I love that they are directional. Very clever!
You have inspired me to try creating a solar light project. This is a wonderful idea. I love the ambiance it creates.
Debra, go for it. These things don’t have to be difficult but they can be fun. Thanks!
Aren’t you clever?! I never would have thought of this and it’s a wonderful idea!
Thank you Paula.
Genius! I would never think of something like this.
Thank you Amanda.